FAQs
Providing Solutions to Frequently Asked Questions about QFM and P3rform

FAQ's
How do I view all the Planned Maintenance Schedules for a particular site?
It is possible to create filters in the Schedule Planner for example to display all Planned Maintenance schedules for a particular site.
- Access the Schedule Planner from the Events menu option.
- Click the Filter option to add a filter.
- Click the Add Criteria From the drop down list select Site.

- Select the orange lookup option.
- Add the site/s you wish to filter by to the Included field.
- Click Update.
- Click Apply to enable filter condition.

How do I use Event Director filter options?
- Navigate to the Event Director This can be access from the Events menu option.
- Click the Change Filter A number of filter options will display.
- Enable filters as required by highlighting options from Event Event Types or Status fields. Alternatively, filters can be enabled from drop down options.
- Click the Refresh button to apply filters.
How do I troubleshoot Schedule issues in QFM Web?
- Ensure Schedules have been published. Verify the activities have solid borders indicating these have been published. If the activities are unpublished click the Publish button to confirm the activities can be generated into events.
- Check the workflow scheduler service is running for the Generate Events from Plan and Scheduling – Generate Planned Events service.
How do I troubleshoot login issues in QFM?
Warning message “User name or password was incorrect”: indicates an incorrect user name or password. Please check for case sensitivity.
Warning message “You are not setup to access system”: indicates the username does not exist. You will need to set up as a user in order to log in.
Warning message “No geography assigned to this user”: indicates the user’s personnel record does not have a geography assigned. An admin user will be able to maintain the user’s personnel record and assign a geography.
How do I subscribe new Assets to existing Planned Maintenance Schedules?
- Navigate to the asset record by searching for the asset in the Find Asset screen. This can be accessed from the Assets menu.
- From the Asset Viewer click the Schedules.
- Click the Subscribe to Schedule.
- Click the lookup option to search for an existing schedule to subscribe the asset to. Select the schedule.
- Add date and time options in the Subscribe From field and if required the Subscribe To field.
- Click Subscribe to save.
How do I share Event Director views in QFM Web?
The ability to maintain shared views in the Event Director is a permission setting managed in General Settings.
- Navigate to the Event Director.
- Once the Event Director view has been maintained click Save View.
- Update the name in the ‘Save View As’ field.
- Click the Share View.
- Click OK.
How do I setup a Schedule Report?
There are two job types:
- Group Notifications
Group Notifications allow users to attach Lists to scheduled emails, in addition to Reports. A List can either be a .CSV file attachment or rendered HTML embedded into the email body. - Mail Merge Notifications
Mail Merge Notifications allow users to send emails to recipients who are part of the data contained in an existing list view. The list view would contain an email column for the recipient’s email address, and other data columns to be used in the email’s subject and body. For example, send a PO Authoriser a notification when they have an event assigned to them with a status of ‘Ready To Authorise’.
The user can construct an email using a mail merge style interface, whereby they insert a tag representing a column name in the list view. The recipient will then receive the row-column value from the list view, via email at runtime. For example, the tag {#FirstName#} will be replaced with ‘John’ for the row in the list view corresponding to John Smith.
- Group Notifications
Adding a New Scheduled Report
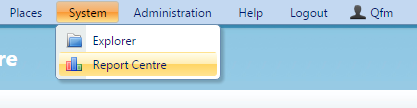
- Go to the Report Centre from the System menu option.
- Expand the All Reports Expand the Scheduled Jobs option then select Add Schedule.
Enter a unique Name for the schedule, (this cannot be amended once saved). Enter a short Description of the schedule. - In the Job Type field select Group Notifications from the drop-down list.
In the Editable By field select the User Group which will have permissions to modify the job. - Select Next.
To add a Report:
- Select the Reports tab then select Add Report.
- In the Report Selection window select the report you wish to schedule from the dropdown list, then select the report filter required.
Select OK. The Report is added. - You can Edit the report via the icon, and Delete the report via the icon.
Select Next. - The next screen allows you to set up the email to which the report will be attached.
- Add a Subject Line then enter the email Body
- The Use Plain Text Editor (Formatting will be lost) link and Upgrade to HTML Editor link enable you to switch between formatting editors
- Select Next.
- The final screen enables you to set the schedule for the report. In the Scheduling section select the date range in the Schedule begin and End Then set the frequency in the Repeat job every fields and the time range fields.
- The Schedule relative to actual last run (rather than scheduled run time) tick box allows you to specify that the frequency should be applied from the actual time that the report was last run.
In the tick boxes select the days of the week on which the report should be run. Optional Suppression Options are available on this screen. - Tick the Notify only when records exist in box then select a report to suppress when no records are present.
- Tick the Suppress repeated records box to suppress the report if data is the same as when the report was last run. You then need to select the column or columns needed to determine the ‘uniqueness’ of data. For example, if you select ‘Event ID’ column, the data will only be sent if that field’s data has changed.
You can also choose whether to enforce the suppression forever or only for a certain period of time (select the radio buttons). For example, if you are repeating the job every minute but don’t want to see the repeats every minute, you could choose to suppress for just 24 hours so that you do get the repeated record but only once a day. - Finally, select Save then click (Run Now) to start the scheduler. This will send the emails out initially and then schedule the next run date.
Adding a New Scheduled List
- Go to the Report Centre from the System menu option.
- Expand the All Reports Expand the Scheduled Jobs option then select Add Schedule.
- Enter a unique Name for the schedule, (this cannot be amended once saved). Enter a short Description of the schedule.
- In the Job Type field select Group Notifications from the drop-down list.
In the Editable By field select the User Group which will have permissions to modify the job. - Select Next.
- To add a List:
Select the Lists tab then select.
- The List Selection window displays a tree view structure of available lists. Locate the list you wish to send and select a view under that list.
Note: You must select a view, not the list itself.
You then need to select an Include Method. This determines how the list will be included in the accompanying email. By selecting Attachment, the list will automatically be attached to the email (as with reports) as a CSV file. If you select HTML, you will have the option to embed the list as HTML in the body of the email (and no attachment).
Note: If you select ‘Attachment’ you can do both.Select OK. The List is added. - You can Edit the list via the icon, and Delete the list via the icon.
The Include Method is also displayed; either for Attachment, or for HTML.
Select Next. - The next screen allows you to set up the email to which the list will be attached.
- Add a Subject Line then enter the email Body text.
- The Use Plain Text Editor (Formatting will be lost) link and Upgrade to HTML Editor link enable you to switch between formatting editors.
- You can embed a list/s in the email by selecting it from the Formatted Lists drop-down field on the Plain Text Editor; all lists created are listed for selection. (This adds a tag that will be replaced with the actual data at runtime).
- Select Next.
- The final screen enables you to set the schedule for the list. In the Scheduling section select the date range in the Schedule begin and End then set the frequency in the Repeat job every fields and the time range fields.
- The Schedule relative to actual last run (rather than scheduled run time) tick box allows you to specify that the frequency should be applied from the actual time that the list was last run.
In the tick boxes select the days of the week on which the list should be run. - Optional Suppression Options are available on this screen.
- Tick the Notify only when records exist in box then select a list to suppress when no records are present.
- Tick the Suppress repeated records box to suppress the list if data is the same as when the list was last run. You then need to select the column or columns needed to determine the ‘uniqueness’ of data. For example, if you select ‘Event ID’ column, the data will only be sent if that field’s data has changed.
You can also choose whether to enforce the suppression forever or only for a certain period of time (select the radio buttons). For example, if you are repeating the job every minute but don’t want to see the repeats every minute, you could choose to suppress for just 24 hours so that you do get the repeated record but only once a day. - Finally, select Save then click Run Now to start the scheduler. This will send the emails out initially and then schedule the next run date.
2. Mail Merge Notifications
Adding Mail Merge Notifications
- Go to the Report Centre from the System menu option.
- Expand the All Reports Expand the Scheduled Jobs option then select Add Schedule.
- Enter a unique Name for the schedule, (this cannot be amended once saved). Enter a short Description of the schedule.
- In the Job Type field select Mail Merge Notifications from the drop-down list.
In the Mail Merge List field select the Select - The List Selection window displays a tree view structure of available lists. Locate the list required then select a view under that list.
Note: You must select a view, not the list itself. The view must include an ‘email’ column. - Select OK.
- In the Editable By field select the User Group which will have permissions to modify the job.
Select Next. - The next screen allows you to set up the email to which the notification will be attached.
- In the Pick Email Column field select the column name which contains the email address; this may not necessarily be ‘Email’. (The system will attempt to automatically select a value which has ‘email’ in its name).
- Add a Subject Line then enter the email Body
- The Use Plain Text Editor (Formatting will be lost) link and Upgrade to HTML Editor link to enable you to switch between formatting editors.
- Create your email as required and select the column values you wish to use from the Mail Merge List Columns drop-down field on the Plain Text Editor. (This adds a tag that will be replaced with the actual data at runtime).
- Select Next.
- The final screen enables you to set the schedule for the job. In the Scheduling section select the date range in the Schedule begin and End Then set the frequency in the Repeat job every fields and the time range fields.
The Schedule relative to actual last run (rather than scheduled run time) tick box allows you to specify that the frequency should be applied from the actual time that the job was last run.
In the tick boxes select the days of the week on which the job should be run. - Optional Suppression Options are available on this screen.
Tick the Suppress repeated records box to suppress the job if data is the same as when the list was last run. You then need to select the column or columns needed to determine the ‘uniqueness’ of data. For example, if you select ‘Event ID’ column, the data will only be sent if that field’s data has changed.
You can also choose whether to enforce the suppression forever or only for a certain period of time (select the radio buttons). For example, if you are repeating the job every minute but don’t want to see the repeats every minute, you could choose to suppress for just 24 hours so that you do get the repeated record but only once a day. - Finally, select Save then click Run Now to start the scheduler. This will send the emails out initially and then schedule the next run date.
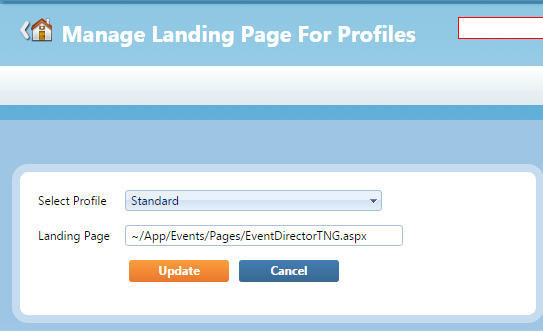
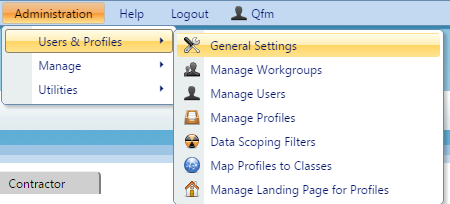
How do I setup a default home page on QFM Web?
It is possible to set up default home pages on QFM web for user profiles.
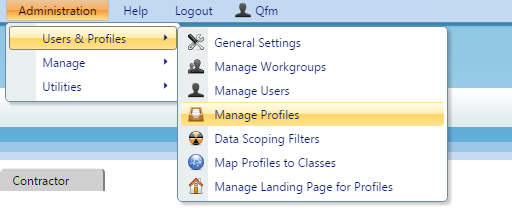
- Navigate to the Managing Landing Page for Profiles This can be accessed via the Administration menu option, Users and Profiles sub menu.
- Select the profile you wish to maintain the landing page for from the ‘Select Profile’ drop down option.
- Update the Landing Page field to define a new home page.
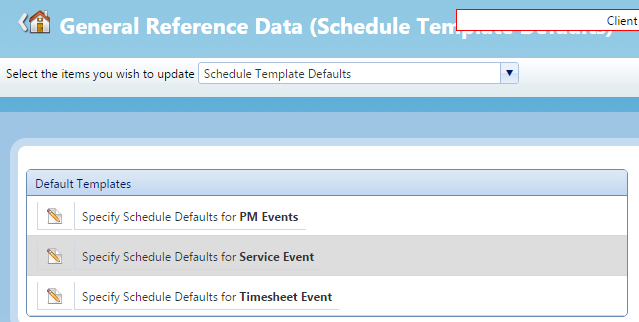
How do I set up Schedule templates?
- Navigate to the General Reference Data This can be accessed from the Administration menu, Manage sub menu.
- Select Schedule Template Defaults from the drop down option.
- Click the Edit icon for the PM Events.
- Click the Change option to maintain the template.
- You can configure the template, once complete click Save.
How do I set up data scoping restrictions?
Data scoping restrictions can be enabled by User Class.
- Navigate to the Data Scope Filters. This can be accessed from the Administration menu option, Users & Profile sub menu.
- Select the Class you wish to maintain from the ‘Select Class’ drop down option.
- Select the entity you wish to restrict from the ‘Pick Filter Type’ option.
- Update the Included field and Excluded field using the arrows to maintain the data that should be accessible and restricted to users within the defined class.
- Click Refresh once complete.

How do I set up 2X and RDP software?
- The 2X RDP Client – can be downloaded from http://www.2x.com/rdp-client/downloadlinks/
- Start the 2X RDP Application and select ‘Add New Connection…’ from the ‘File’ menu. Enter the details as below, replacing the username and password with the ones provided by a representative from the SWG Professional Services team.
- Click on the ‘Display’ tab and ensure configuration matches the screenshot.
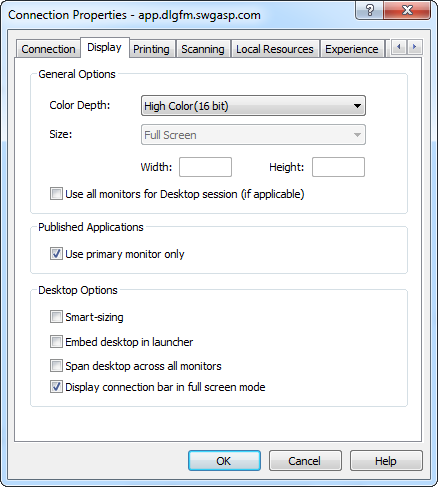
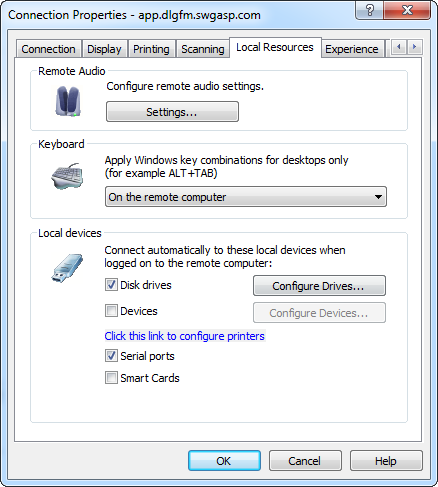
- Click on the ‘Local Resources’ tab and ensure configuration matches the screenshot.
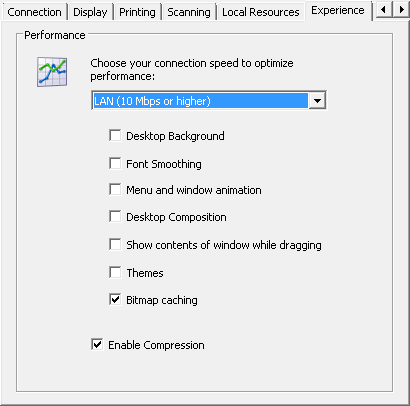
- Click on the ‘Experience’ tab and ensure configuration matches the screenshot.
- Click on the ‘Advanced Settings’ tab and ensure configuration matches the screenshot
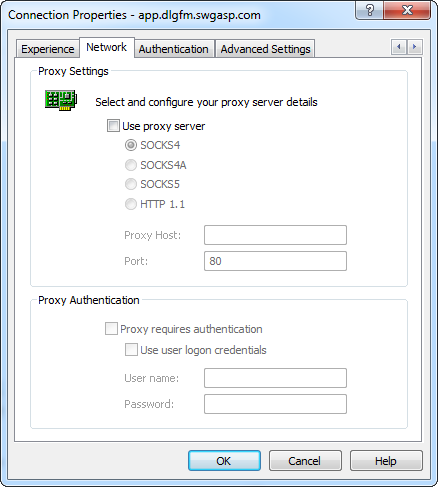
- If you are connecting from behind a Proxy server you will have to contact your IT department in order to get help configuring the connection. The relevant screen on the client software can be found under the Network tab.

- Click ‘OK’. You will see the new connection in the 2x client’s window.
- 2X will add a new item to your Start menu as below. Once you have performed the above steps you should not need to do them again, from now on you can just go directly to the Start menu.
- Select the ‘QFM5’ entry. You might see a security warning dialogue like below.
Check that the certificate is for app.swgasp.com by clicking on the ‘View Certificate…’ button. If so, you can tick ‘Do not ask me again.’ - After a short delay, the QFM application will launch in a window on your local desktop. You should be using the username and password provided to log on.
How do I see what Services are under a particular Service Group?
Desktop
- Navigate to the Service
- Click the Service option.
- Use the Navigation buttons to browse through the Service records to identify what Services are in a Service Group.
Web
- Navigate to the General Reference Data This can be accessed from the Administration menu, Manage sub menu.
- Select the Services option from the drop down list.
- Use the Navigation buttons to browse through the Service records to identify what Services are in a Service Group. Alternatively, use the filter option in the Service Group column to restrict by a Service Group and display the Services associated to the filtered Service Group.

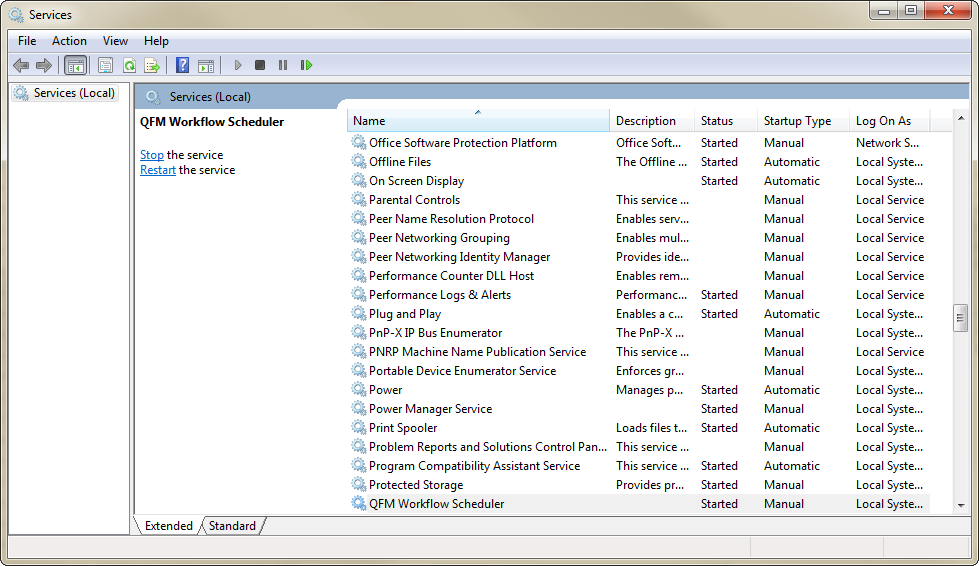
How do I reset the Workflow Scheduler?
The Workflow Scheduler service can be restarted on the Workflow Scheduler server.
- Access Services.msc by typing ‘Services’ or ‘Services.msc’ into the Windows Start menu and press enter.
- Locate the QFM Workflow Scheduler service and click the Restart option.
How do I replace the standard QFM logo with a custom logo?
- Navigate to the Images subfolder of your QFM Web Instance Installation (on a default QFM Web instance install this would be C:InetpubWWWRootQFMUIImages)
- Update the QFMSoftwarelogo.jpg, QFMlogoSmallScreen.png and QFMlogoSmallScreen_ED.png file.
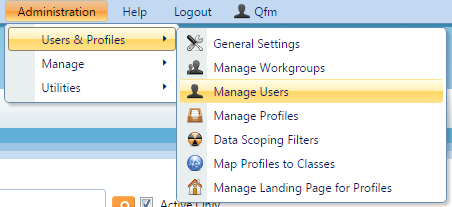
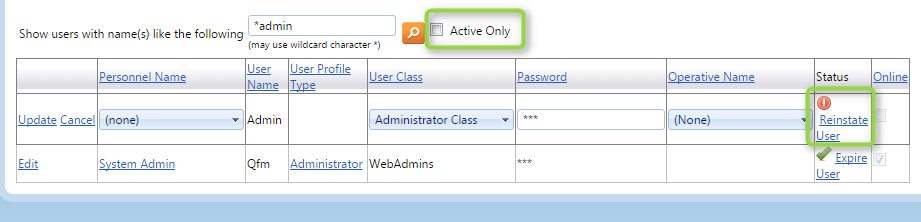
How do I reinstate a QFM user account?
Problem
How do I reinstate a QFM user account?
Resolution
To instate a QFM User Account you will use ‘Manage Users’ via the Administration tab on QFM Web. To change these settings you must first login as an Administrator on QFM Web.
- Navigate to ‘Manage Users’.
- Un-tick ‘Active Only’ to show expired users.
- Search for the user that is expired.
- Click the ‘Reinstate User’ button.
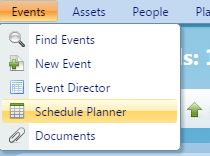
How do I publish Schedules in QFM Web?
Problem
How do I publish Schedules in QFM Web?
Resolution
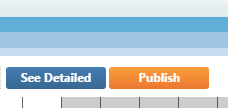
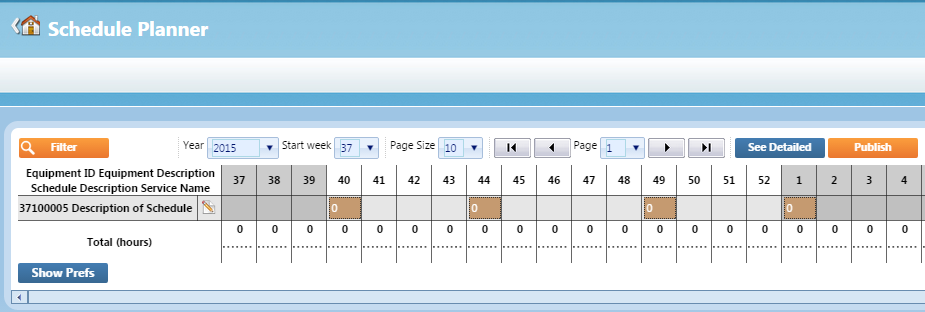
- To publish Schedules in QFM Web navigate to the ‘Schedule Planner’.
- Click ‘Show Prefs’ in the bottom left of the screen, this will reveal the option to select how many weeks ahead you wish to publish your schedules.
- When you publish from the Schedule planner it’s important to remember that you will only publish what you have in your view. If you want to publish every schedule (as is the norm) then you will want to make sure the filter screen is blank.
- When you are happy that your filter is correct you are ready to publish your Schedules, click the ‘Publish’ button located in the top right of the screen.

How do I provide ‘Self Service’ profile users with access to attachments?
Problem
How do I provide ‘Self Service’ profile users with access to attachments?
Resolution
This is done via ‘General Settings’ within the Administration Tab on QFM Web. To change these settings you must first login as an Administrator on QFM Web.
- Navigate to ‘General Settings’.
- Select the User Class you wish to change the settings for, using the dropdown at the top of the page. If you want to change the settings for Self Service select ‘Self Service’.
- Navigate to ‘General Event Logging’; the main setting for attachments is called ‘Allowed to view attachments’ and there are also additional settings for attachments here.
- When you want to save your changes scroll to the bottom of the page and click ‘Apply Settings’.
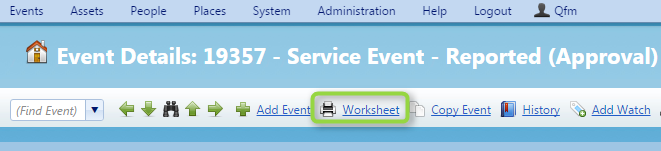
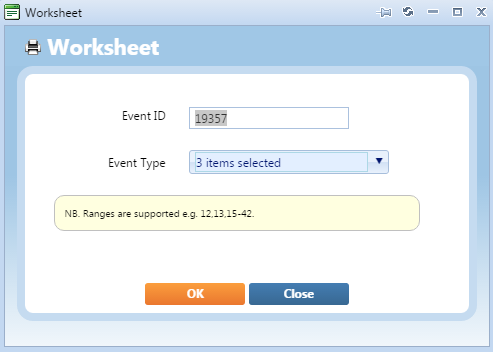
How do I print Event worksheets?
- To print an Event Worksheet on QFM Web navigate to the event you wish to print and click ‘Print Worksheet’.
You will be presented with a pop-up window, click ‘OK’ on this and the worksheet will be downloaded.
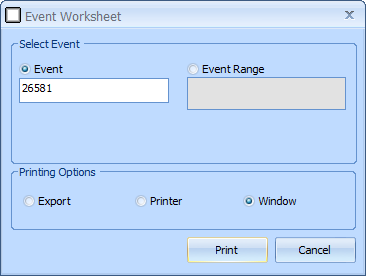
To print an Event Worksheet on QFM Desktop, navigate to the event you wish to print and click the printer icon in the top left.
- You will be presented with a pop-up window, click ‘Yes’ on this and the worksheet will be downloaded to a report viewer and from here you can save it where you want.

How can I change the view on Event Director so it looks the same on QFM Web and QM Desktop?
Problem
How can I change the view on Event Director so it looks the same on QFM Web and QM Desktop?
Resolution
The Event Director on the Desktop contains all the data in the system; it has the capacity to do this as it is a standalone program.
The Event Director programme on QFM Web is filtered based on time scale – the default value for this is 30 days but this can be changed as you require. The reason we have a filter on the Web Event Director is to increase the performance of the system.
It is not recommend that you make these two Directors match, as the filters prevent performance issues on QFM Web.
How do I import data into QFM?
Problem
How do I import data into QFM?
Resolution
QFM data import not recommend by SWG without prior training, as incorrectly imported data can result in problems throughout the system.
The import can be collated on an Excel document named ‘Data Import Spreadsheet’, and a blank copy of the spreadsheet can be found on the root directory of your QFM5 Desktop install.
SWG offer training courses on the QFM Import; please contact your SWG Account Manager or Support team on support@swg.com to learn more.
How do I generate attachments on schedules in QFM Web?
Problem
How do I generate attachments on schedules in QFM Web?
Resolution
To generate attachments on schedules in QFM Web, you should add them against the schedule activity. You will only be able to add attachments after you have saved your schedule (this is the same logic that applies to adding an attachment to an event before saving the event).
- Assuming the Schedule has been saved enter editing mode on the schedule then navigate to the Attachments tab on the Scheduled Activity.
- You can now add an attachment in the same way you would on an event. If you require assistance with this please refer to ‘How do I add an attachment to an Event in QFM Web?’
How do I generate additional user reports from the Event screen?
Problem
How do I generate additional user reports from the Event screen?
Resolution
User Reports are not created in QFM; they are developed on a per client basis. You can normally replicate the report you want by using filters on an ‘Event History Report’.
If you want to find out more about User Reports and how SWG can develop bespoke reports for your needs, contact your SWG Account Manager or the support department on support@swg.com.
How do I generate a Year Planner Report?
Problem
How do I generate a Year Planner Report?
Resolution
You can create a Year Planner Report via the ‘Report Centre’.

A Year Planner Report is a report version of what you see on the ‘Schedule Planner’ screen.
How do I delete old event data from QFM?
Problem
How do I delete old event data from QFM?
Resolution
Event data is locked down and cannot be easily deleted from the system, since it is standard practice to retain historical event data for auditing purposes. If required, SWG can archive old data and create a blank database which does not contain any historical event data, which can be used moving forward.
If you wish to find out more about SWG’s data archiving services, please email support@swg.com or contact your SWG Account Manager.
How do I disable automatically filling fields in QFM Web?
Problem
How do I disable automatically filling fields in QFM Web?
Resolution
There are various fields that can be setup to fill automatically, based on selected data. The setting for this can be found on ‘General Settings’.
- To change these settings you must first log in as an Administrator on QFM Web.
- Navigate to ‘General Settings’.
- Select the User Class you wish to change the settings for, using the drop down at the top of the page. If you want to change the settings for everyone who uses QFM select the ‘Global User Class’.
- You will be able to change the settings for defaulting fields within ‘General Event Logging’.
How do I create Sites?
Problem
How do I create Sites?
Resolution
To create a new site, the best way is to login to QFM Desktop.
- Navigate to ‘Site’.
- Click the ‘Add’ button in the bottom right corner (as is the standard in QFM Desktop).
- You will now be able to enter values for a new Site, when you have finished click ‘Save’ in the bottom right.

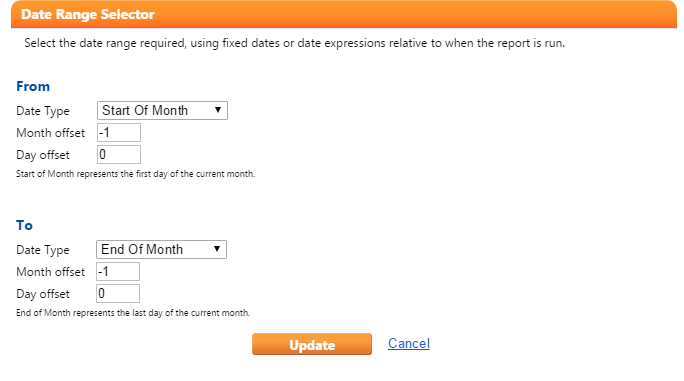
How do I create reports in QFM Web that have dynamic dates so I don’t have to change them each month?
Problem
How do I create reports in QFM Web that have dynamic dates so I don’t have to change them each month?
Resolution
When creating a report there will be times when you wish to create dates that are dynamic so that you don’t have to keep changing the dates for a regular report. In addition, when a report has been setup to use a dynamic date, it makes it suitable to be used as an automated Scheduled Report date options.
Dynamic dates can set via the date option you get to this via the magnifying glass.

You can setup pretty much any range of date here. In my example we have set a monthly report for the previous month by using a -1 offset on a month range.
How do I create new Geography in the correct format?
Problem
How do I create new Geography in the correct format?
Resolution
The correct format for Geography differs from one client to the next there is no set standard across the board.
The most common approach however is to use one of four levels:
- Site – The complex/campus name e.g. The Olympic Park.
- Location – The building name e.g. The Olympic Stadium.
- Unit – The area or floor number e.g. Level 1.
- Partition – The room number or partition e.g. D45e.
How do I create new QFM user accounts?
Problem
How do I create new QFM user accounts?
Resolution
To setup new user accounts you will need to log in to QFM Desktop with a user who has Administrator rights.
- First navigate to ‘Personnel’ and create a new personnel record for the new user to use.
- Now navigate to ‘Maintain Users’ from the Admin tab.
- Click the ‘Add’ button in the bottom right which will start the new user wizard:
a. Enter a username.
b. Select the personnel name which you have just created in the previous step.
c. Create a password.
d. Select your language.
e. When you have added all of these fields you can now save the new User. There are additional fields such as Expiry date but these are optional.
How do I create a Schedule Planner Report?
Problem
How do I create a Schedule Planner Report?
Resolution
- You can create a Schedule Planner Report via the Report Centre.
- You can then either :
a. Generate an Event History Report and create a filter for PM Events (this process is explained in detail in ‘How do I create a report based on filters in QFM Web?’)
b. Generate a ‘Year Planner Report’ which will be report version of the same thing you see on the Schedule Planner screen.
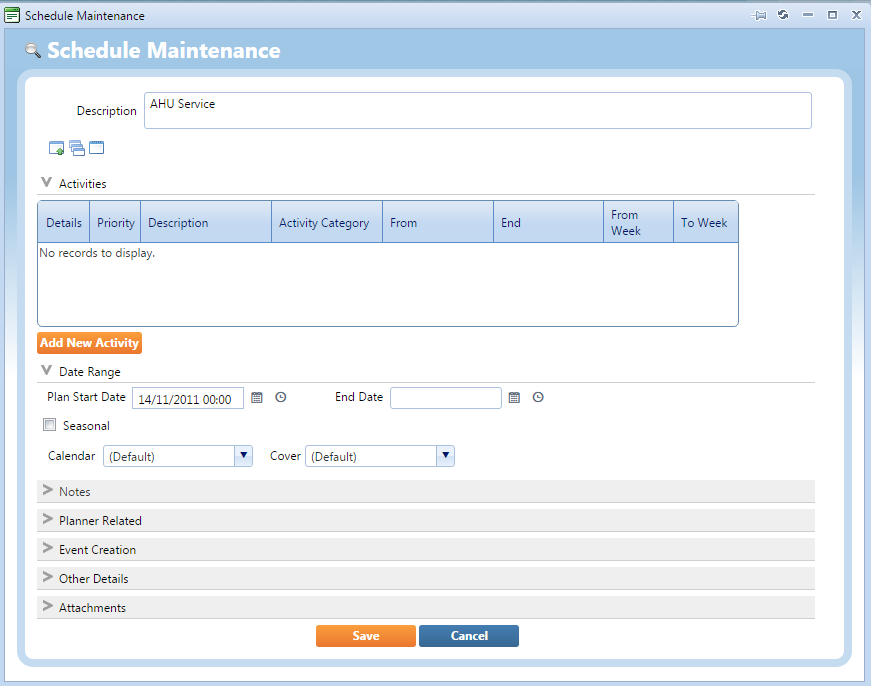
How do I create a Planned Maintenance Schedule in QFM Web from scratch?
Problem
How do I create a Planned Maintenance Schedule in QFM Web from scratch?
Resolution
To answer this question we will run through a worked example.
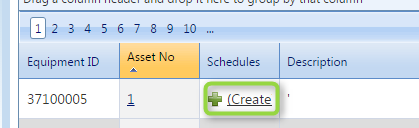
- The first thing we want to do is find the asset which we want to create a schedule for, do this via the ‘Find Assets’ screen.
- The easiest way of a starting the wizard is via the ‘Schedule’ button on the ‘Find Asset’ search results, alternatively you can launch it via the main screen of the asset via the schedules tab.
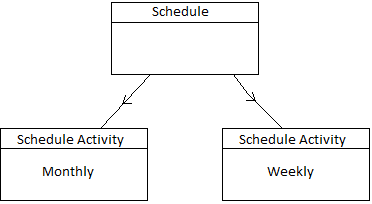
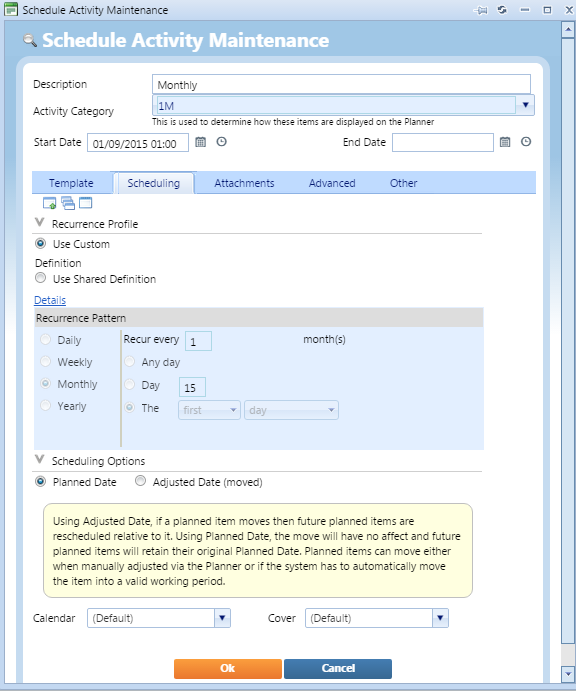
- Now you will be presented with a blank schedule. A schedule comes in two parts. The schedule and then the schedule activity, you can have more than one schedule activity in a schedule. The reason we have more than one is because on schedule activity may be weekly maintenance while the other monthly etc.
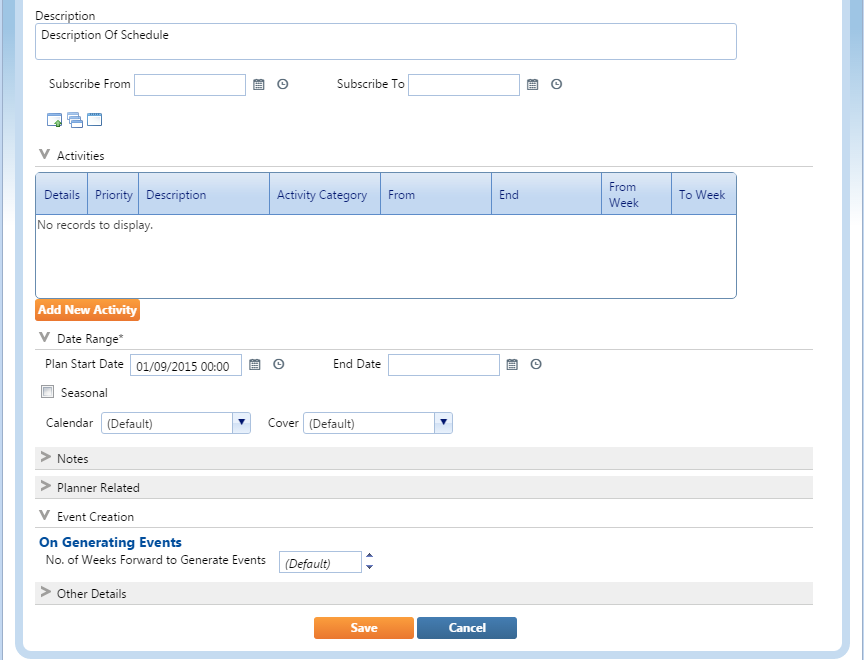
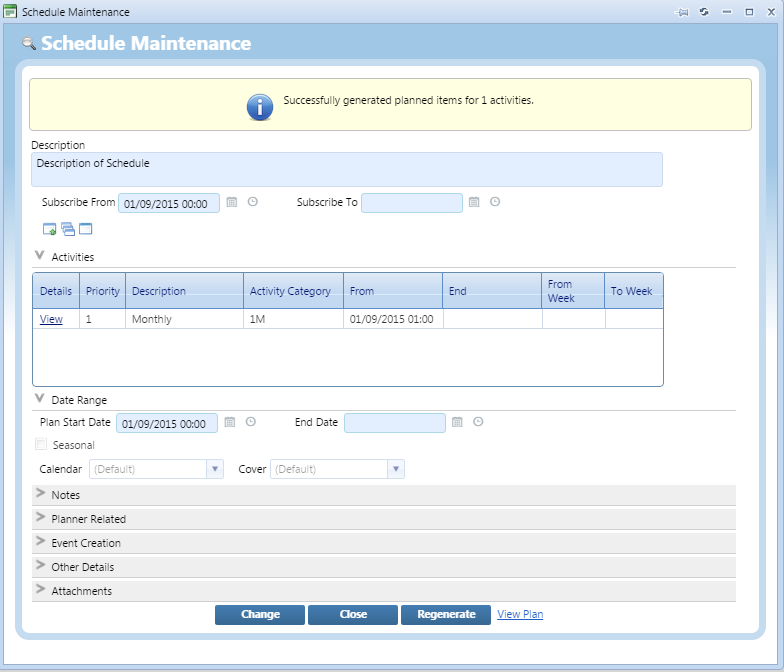
- We will set up the Schedule as follows:
a. Description – A short description for what the schedule is.
b. Subscribe From – Leave blank
c. Activities – Skip this section for now.
d. Plan Start Date – We have used ‘01/09/2015 at 00:00’ set this value to be when you want the schedule commence, this has to be before the Activity start date.
e. Leave the rest of the items on here as the default.
- Now we have created the Schedule we will now create the scheduled activity, to start this click ‘Add Activity’:
a. Description – A short description for what the activity is e.g. Monthly Service
b. Activity Category – This is purely aesthetic, it will control which colour scheme is used for the schedule graphically, we picked the monthly colour scheme.
c. Start Date – This is important as it will dictate when the first scheduled activity will start, this date has to be after the schedule start date so we set ours to start 1 hour later.
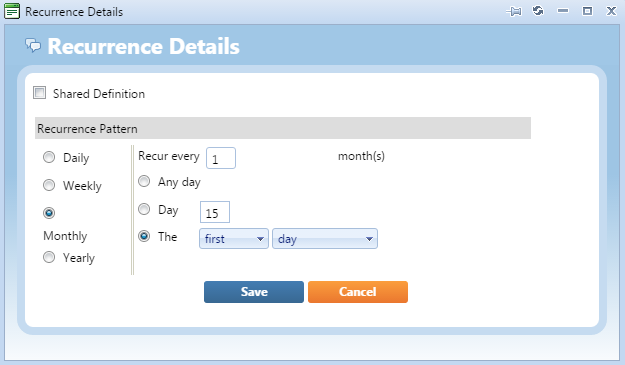
d. Reoccurrence Profile – This is also important as it will dictate how often the activity will create an event e.g. Yearly, Monthly, Weekly. To add a profile click the green plus and you will be given a simple pop-up asking how often to create events, we set ours up as a monthly schedule to generate at the start of every month.
e. Leave everything else on this tab blank.
f. Now select the ‘Template’ tab on the Activity, this will bring up the tab where you should enter in the details you want to see on then events that get generated from this activity.
g. Once you are done here click ‘Save’. - Now we are ready to save the schedule so click ‘Save’ on the schedule screen too. You will be presented with a pop-up, just select ‘Ok’ on this.
- Now you should have received a message at the top of the schedule to say that you have created your schedule correctly.
- Now if you click on the ‘View Plan’ you will be presented with the graphical representation of your schedule.

How do I create a report based on filters in QFM Web?
Problem
How do I create a report based on filters in QFM Web?
Resolution
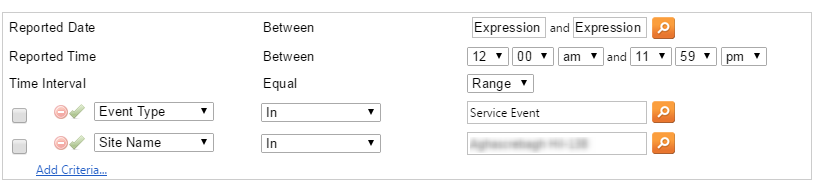
To explain this process we are going to explain it via a worked example. We are going to create a report which we will be setup to pick up all events logged in the last month based on two filters.
- To start you will need to navigate to ‘Report Centre.’
- Next you want to go into Reports > Event History Reports.
If you don’t have this option contact you your QFM administrator in order to enable it for your user. - You will now be presented with a blank report, it will automatically calculate to generate a month back from the current date.The first thing we want to setup is the date range, we will set it up to pick from the start of the last month to the end of last month. To do this you want to go into the date options, you get this via the magnifying glass.
You now want to pick the start of last month by picking start of the month and applying a -1 month offset. The same logic applies to the other date. You can setup pretty much any range of date here.
- Now we will add the two filters, In the example we will use ‘Event Type’ and ‘Site’. These will be filtered down to ‘Service Events’ and one site. You can add multiple values in the filters although we are only picking one value in this example.
- We have now completed the report, the final thing we will want to do is save the report so we can load it up in the future.


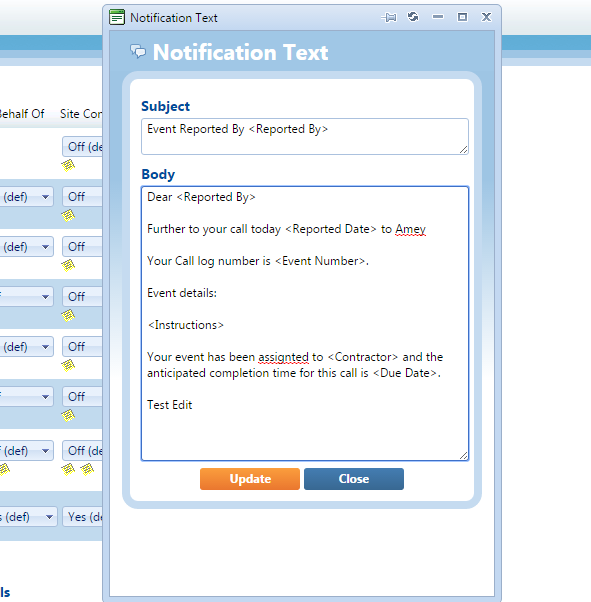
How do I configure email notifications on QFM Web?
Problem
How do I configure email notifications on QFM Web?
Resolution
To configure email notifications on QFM Web you must first login as a user with administrator rights.
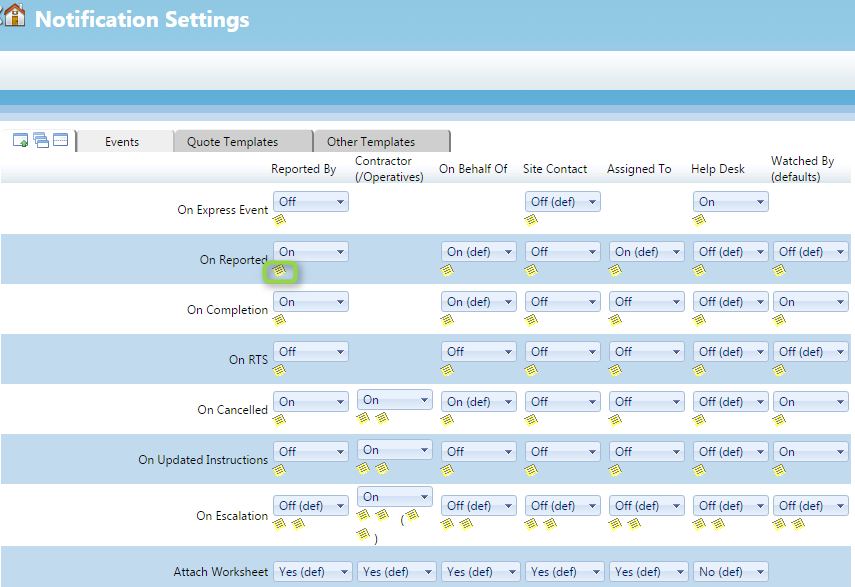
- Navigate to ‘Notification Settings’.
- You will now be presented with the crib sheet for configuring email notifications, on this page you can choose to turn on/off a variety of email at various statuses for different type of user.
- If you want to configure the text of the emails themselves click on the yellow post-it to bring up the email subject and body which you can edit.

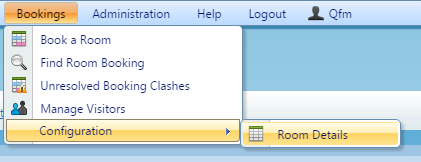
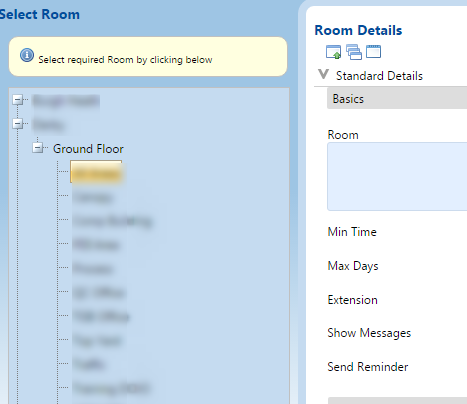
How do I change the room setup configuration for Room Bookings in QFM Web?
Problem
How do I change the room setup configuration for Room Bookings in QFM Web?
Resolution
- To configure a room setup you will have to navigate to ‘Room Details’.
- Select the room you wish to change via the navigation bar on the left hand side of the screen.
- Once the room loads you should be able to configure various changes. If you cannot make any changes because the fields are locked you should contact your QFM administrator to enable the ability to edit rooms for your User Class/Profile. This would be done via ‘General Settings’ on the Admin tab.
How do I change the recipients of a Scheduled Report?
Problem
How do I change the recipients of a Scheduled Report?
- Resolution
To change the recipients of a Scheduled report can be done in two ways; it depends on how the report was setup initially. If the report was setup with just one recipient then you can change the recipient by navigating to the report in the Report Centre.
- Click on the scheduled report you wish to edit and click through the setup until you reach the recipients. Once on this page you can edit the recipient.
- If you have setup the Scheduled Report to use a workgroup then to change or add recipients to it you will have to navigate to ‘Manage Workgroups’ where you can configure this.

How do I change the QFM timeout settings in QFM Web?
Problem
How do I change the QFM timeout settings in QFM Web?
Resolution
To change the timeout settings of QFM changes will need to be made to the configuration file on the Web Server which hosts QFM Web.
Please contact support@swg.com and request the change, stating what you would like it to be set to. If SWG host your QFM Web we can change this ourselves. If we do not then we will be in touch with further instructions which you can pass on to your IT Department to apply.
How do I change Planned Maintenance Schedules in QFM Web?
Problem
How do I change Planned Maintenance Schedules in QFM Web?
Resolution
- To change a Planned Maintenance Schedule on QFM you must first navigate to the schedule you wish to change. Once you have entered the schedule you will need to enter the editing mode, to do this click the ‘Change’ button which will be located at the bottom of the schedule.
- After you have entered this mode, you will be able to change most of the settings in both the Schedule and the Schedule Activity.
- When you are finished navigate back to the where the Change button was and click ‘Save’.

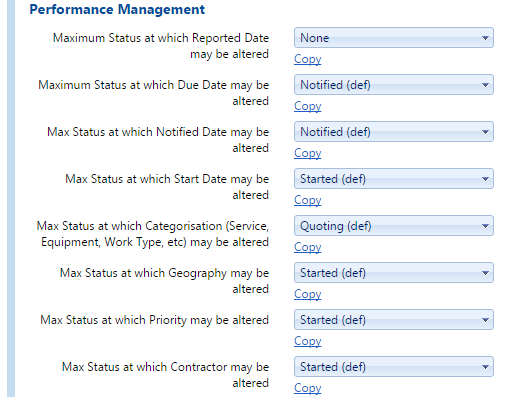
How do I change Event dates if the fields are greyed out in QFM Web?
Problem
How do I change Event dates if the fields are greyed out in QFM Web?
Resolution
If a field is greyed out in QFM Web for a User then this can normally be configured to be updatable via General Settings in Administration, come fields cannot be updated such as ‘Cancelled’.
- To change these settings you must first login as an Administrator on QFM Web.
- Navigate to ‘General Settings’.
- Select the User Class you wish to change the settings for, if you want to change the settings for everyone who uses QFM select the ‘Global User Class’. You select the User Class from the dropdown at the top of the page.
- Navigate to General Event Logging > Performance Management. You will see a variety of settings which control at what point a field cannot be edited past.
- When you want to save your changes scroll to the bottom of the page and click ‘Apply Settings’.
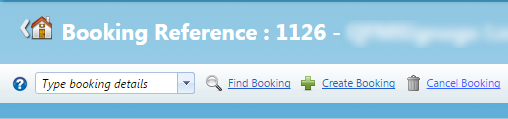
How do I cancel Room Bookings in QFM Web?
Problem
How do I cancel Room Bookings in QFM Web?
Resolution
- To cancel a Room booking you first need to navigate to ‘Find Room Booking’.
- Search for the room booking you want to cancel, once you have found it open up the booking.
- To cancel the booking, click the ‘Cancel’ button at the top of the booking page.
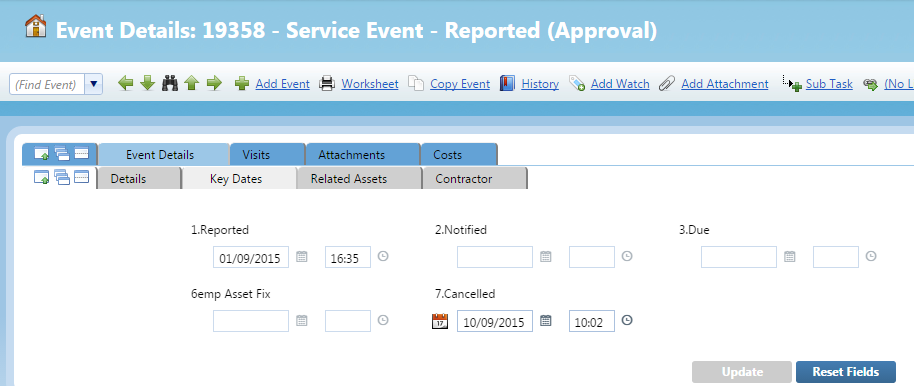
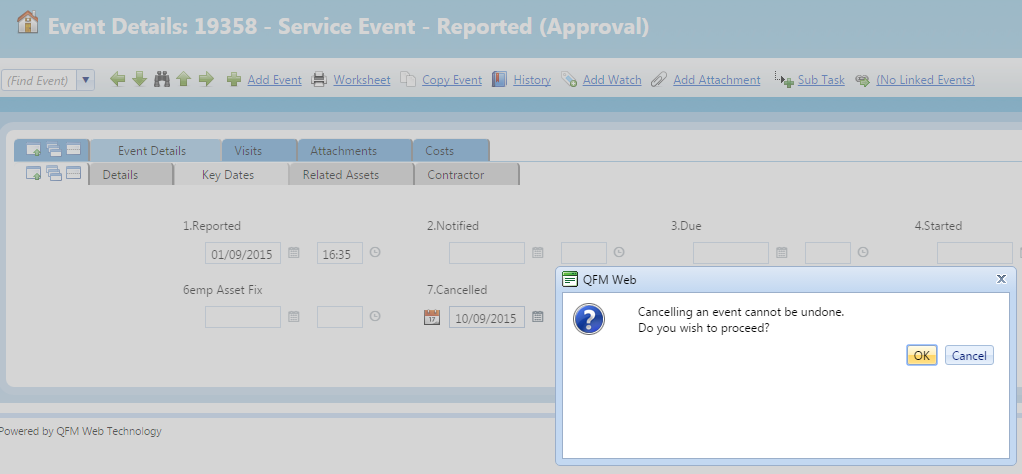
How do I cancel an Event?
Problem
How do I cancel an Event?
Resolution
- To cancel an event in QFM Web you simply add a cancelled time into the Key Dates section of whatever event you wish to cancel and then click ‘Update’.
- You will get a pop-up message instructing you that once you cancel an event in QFM you cannot un-cancel it. Click ‘Ok’ to proceed and QFM will then cancel the event and in doing so set the status of the event to ‘Cancelled’.
How do I amend QFM User Profiles in QFM Web?
Problem
How do I amend QFM User Profiles in QFM Web?
Resolution
1) Navigate to Manage Profiles.
2) Select the profile you wish to amend from the dropdown.
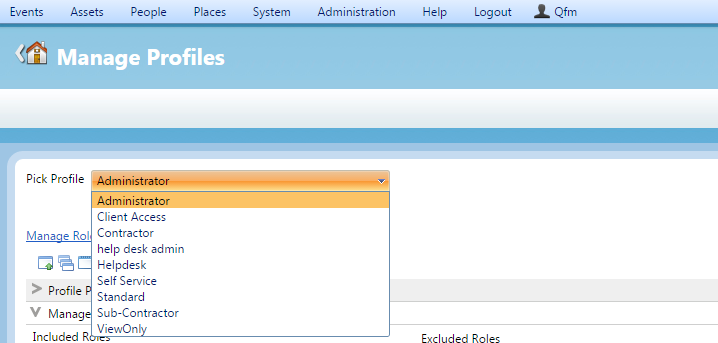
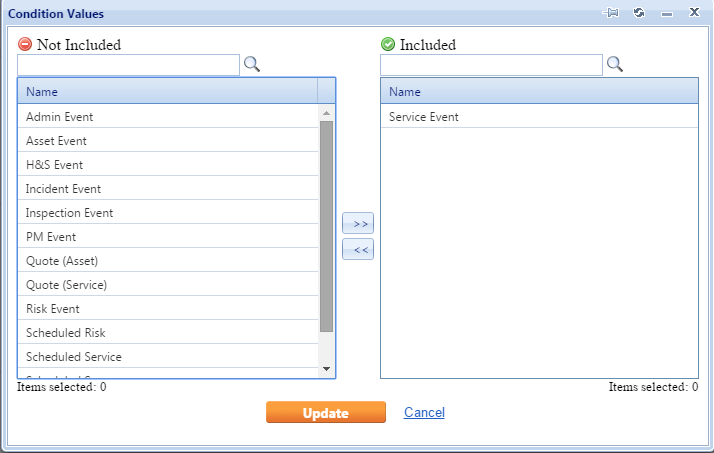
3) Now you can Include or Exclude the modules for the Profile you have selected via Manage Roles. Simply use the navigation arrows to move the highlighted modules from the Included List to the Excluded List or vice versa.

How do I add an attachment to an Event in QFM Web?
Problem
How do I add an attachment to an Event in QFM Web?
Resolution
To add an attachment to an event you must first log the event, you cannot add an attachment to an event that is yet to be created.
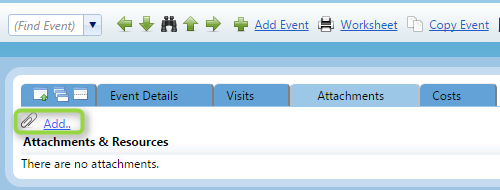
- Navigate to the event you wish to add the attachment too.
- Click on the ‘Attachments’ tab and then click on the ‘Add’ button. If you don’t see either of these buttons please contact your QFM administrator as your User Class will have to have attachments enabled.
- There are three types of attachment you can add in QFM.
- Files – Documents, Images, PDFs. This is the standard attachment type.
- Link to an existing file – This type will link to a file on your local network without adding it to the QFM system.
- Link to a web address – This type will link to a URL.
How do I add a new Work Type in QFM?
Problem
How do I add a new Work Type in QFM?
Resolution
To add a new work type in QFM you will need to use QFM Desktop:
- Login to QFM Desktop with a Admin or Helpdesk level user. If you do not have a user of this level please contact your QFM Administrator.
- Navigate to the ‘Events’ tab.
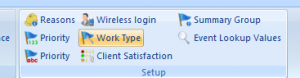
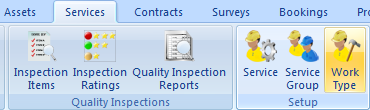
- Navigate to ‘Work Type’, which is found with within the ‘Setup’.
- Click the ‘Add’ button tton in the bottom right.
- A new row will have been added at the bottom of the list, fill this out without the Name of the new Work Type, an Optional Description, leave Category as ‘Standard’, leave ‘Export Value’ blank.
- Click the ‘Save’ button in the bottom right.
- The Work Type has now been added into the system, it can then be managed via the ‘Services’ Tab within ‘Work Type’.

How do I access the templates for Event instructions?
Problem
How do I access the templates for Event instructions?
Resolution
Templates are created in QFM Desktop under each Work Type in the messages section of the Work Type screen.
1) First login to QFM Desktop, with a Helpdesk user.
2) Navigate to the ‘Events’ tab.
3) Navigate to ‘Work Type’, which is found with within the ‘Setup’.

4) Select the Work type you wish to access the template for.
5) Click the ‘Update’ button in the bottom right.
Click the ‘Mes’ button shown below.

Now you can enter in a template for the instructions which will be used as a default when events are logged against this Work Type. Click the ‘Save’ button when you are finished.

I would like QFM Web configured so that contractors can view and maintain only the events assigned to them.
Issue
I would like QFM Web configured so that contractors can view and maintain only the events assigned to them.
Resolution
The process for this undertaken in desktop QFM and must be carried out by a user with administrative rights.
- Make sure the contractor has a record set up in the Contractor screen.
- In the Maintain Users screen, create a QFM Username and Password for the user (belonging to the contractor) who requires access.
- In the Maintain Classes screen, create a specific User Class for the contractor.
- In the User Class Filter screen, select the User Class. Select Contractor as the Filter Criteria then assign the contractor in the Assigned Filters
General errors/problems with QFM Web.
Problem
General errors/problems with QFM Web, experienced in version 1.12.00.10 and earlier.
Cause
QFM Web does not support Microsoft .Net 3.5 SP1. A number of issues have been identified with Service Pack 1 that appear to cause some isolated problems with QFM Web.
Resolution
SWG recommends that you uninstall .Net 3.5 SP1 and re-install .Net 3.5 without Service Pack 1.
Error Message: “Error Login Respond 1” when attempting to login to QFM Web.
Problem
When attempting to login to QFM Web, you may receive an error message that is similar to the following:
“Error Login Respond 1.”
Cause
This can be caused by the database language not being set to “English”.
Resolution
Using SQL Server for the database in question, ensure the Login Properties for QFM Application User have a default language set to English (not British English).
Error Message “Event ID 5, Unable to Update Event” when attempting to update an event in QFM Web.
Problem
When you attempt to update an event in QFM Web whether as a standard user or as a self service user, you may receive an error message that is similar to the following:
“Event ID 5, Unable to Update Event”
Cause
The Microsoft .Net Framework 3.5 SP1 has been identified as the cause of this issue. This has been logged as a problem with .Net via Microsoft. Please await update on defect number.
Resolution
Uninstall .Net Framework 3.5 SP1 and re-install framework 3.5 minus the service pack. This is available from SWG if you are unable to locate this software.