FAQs
Providing Solutions to Frequently Asked Questions about QFM and P3rform

FAQ's
How to Restart the Workflow Scheduler
In the event that the QFM Workflow Scheduler stops working, non-hosted clients will need to raise the issue with their IT department. Hosted clients will need to contact SWG Support.
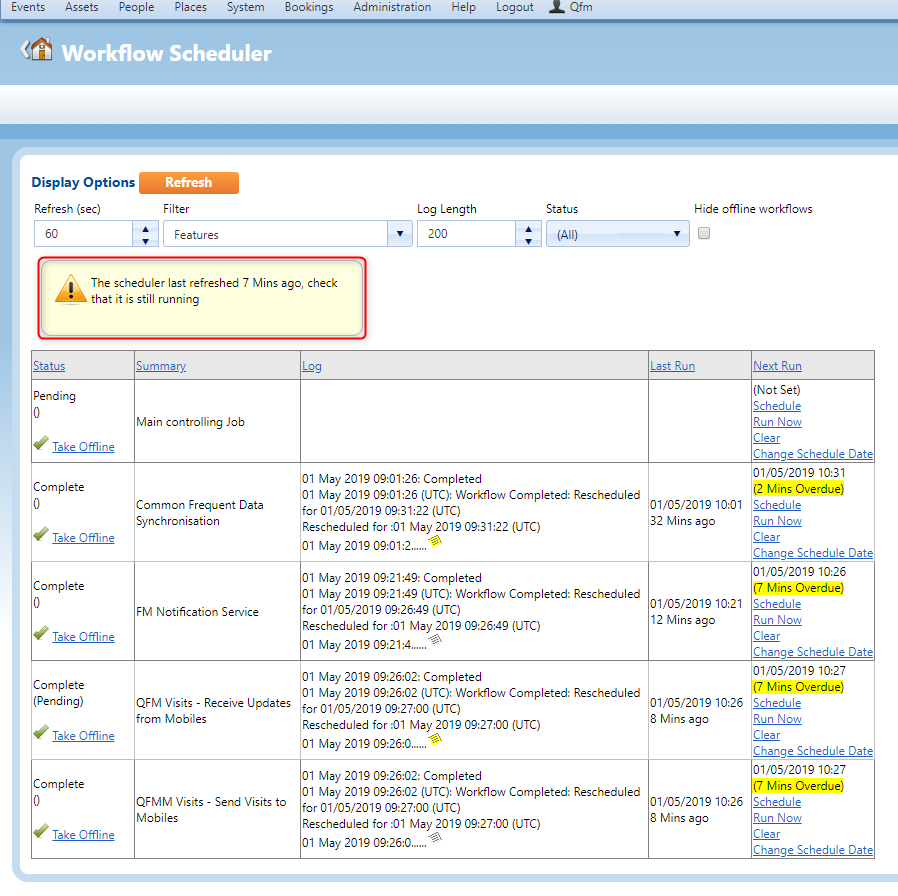
If any of the following errors occur, access Workflow Scheduler via the Administration menu, (Administration > Manage > Workflow Scheduler).
- Emails do not send
- Visits to mobile are not being received
- Reports are not being sent
- PPMs are not generating
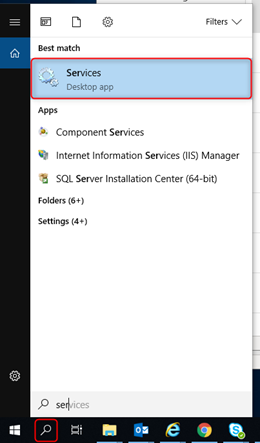
- Within the Workflow Scheduler screen, check when the scheduler was last refreshed. If an error message to check that it is still running is given (as shown below), then go to the Windows Services app.

- Within Services, check whether the QFM Workflow Scheduler, that is linked to your version of QFM Web, has been started. The status should then change to Running.
Note: If it has already been started, Stop the service and Start it again.
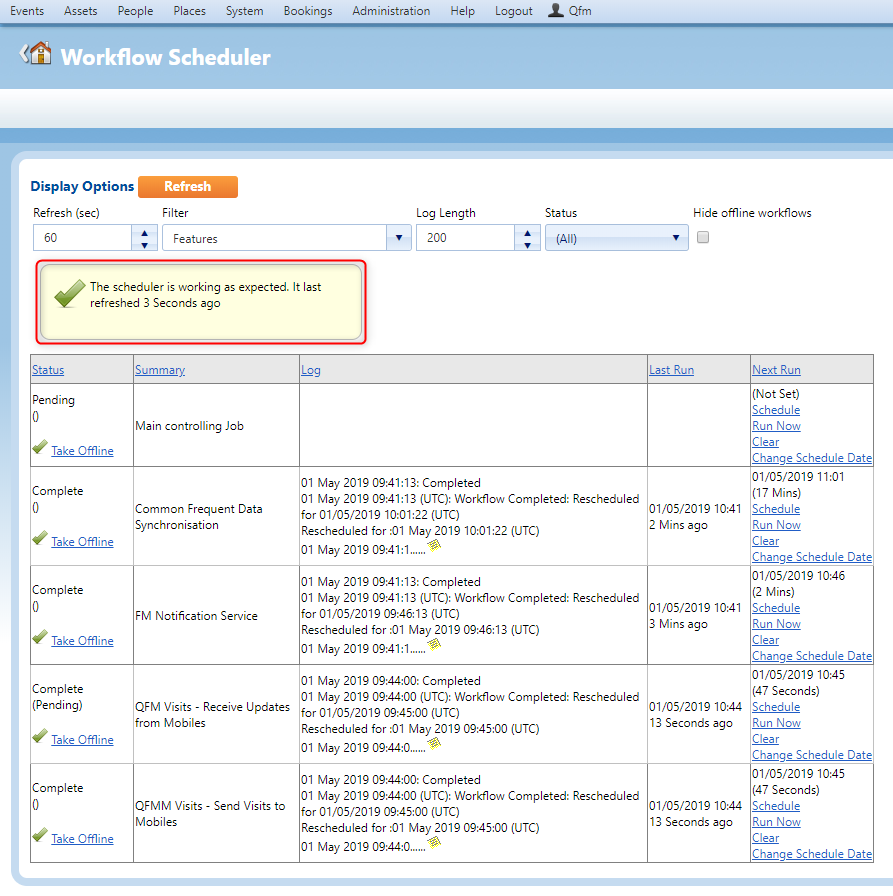
- Once the Services have been restarted, refresh the Workflow Scheduler page in QFM, and ensure the scheduler is working as expected. See below.
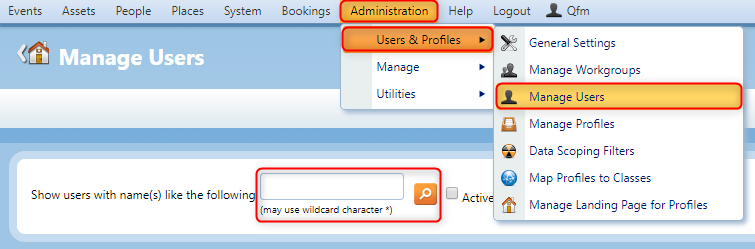
User Unable to Login – No Geography Assigned
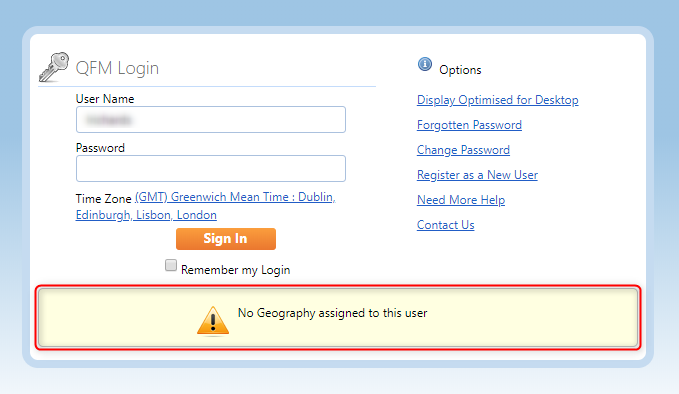
If a user encounters the system message “No Geography is assigned to this user” (as shown below) when attempting to log in to QFM, a QFM administrator must assign geography to the user.
This procedure describes how an administrator can assign the correct geography to a user.
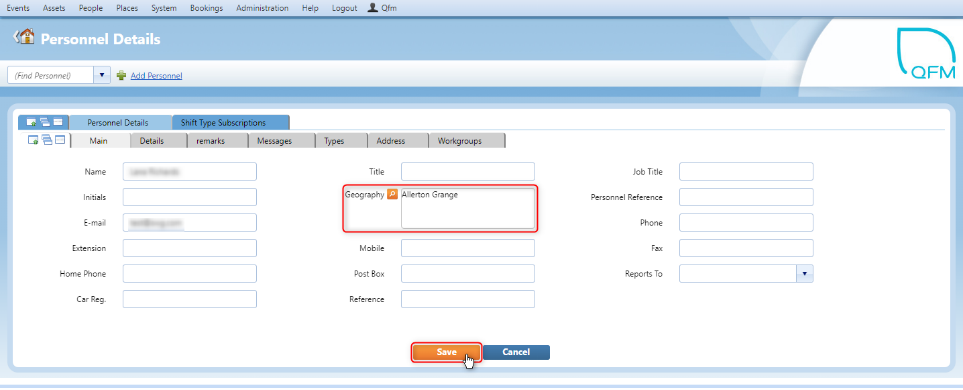
- To assign Geography to a User, go to Administration > Users & Profiles > Manage Users, and search for the user.
- Once you have located the user, select their Personnel Name to take you to their Personnel Details page.
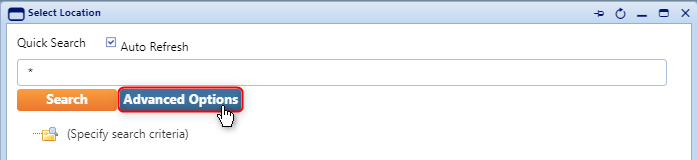
- If the user has not been assigned Geography you can now do this by selecting Change, and using the icon to open the Select Location pop-up box.
Note: The orange icon will display once Change has been selected.
- Select Advanced Options within the Select Location pop-up box.
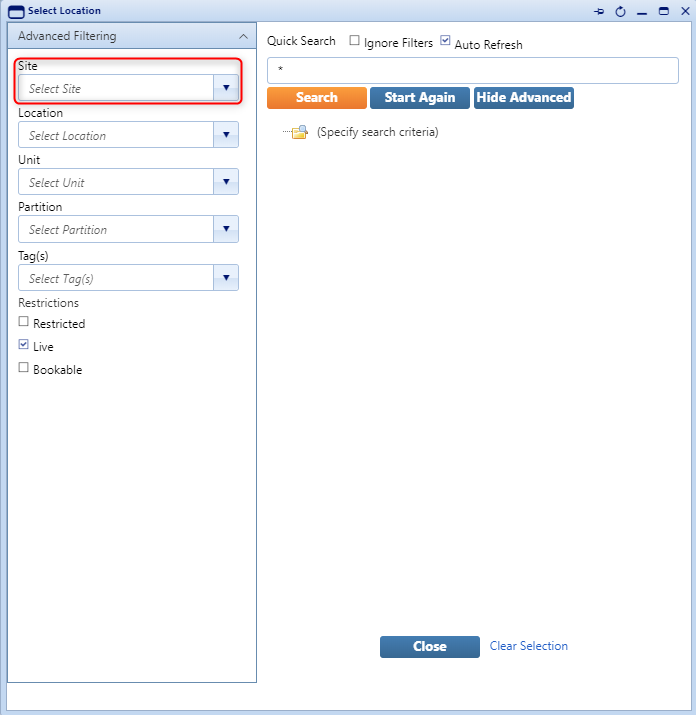
- Search for the Site you would like to assign to the user.
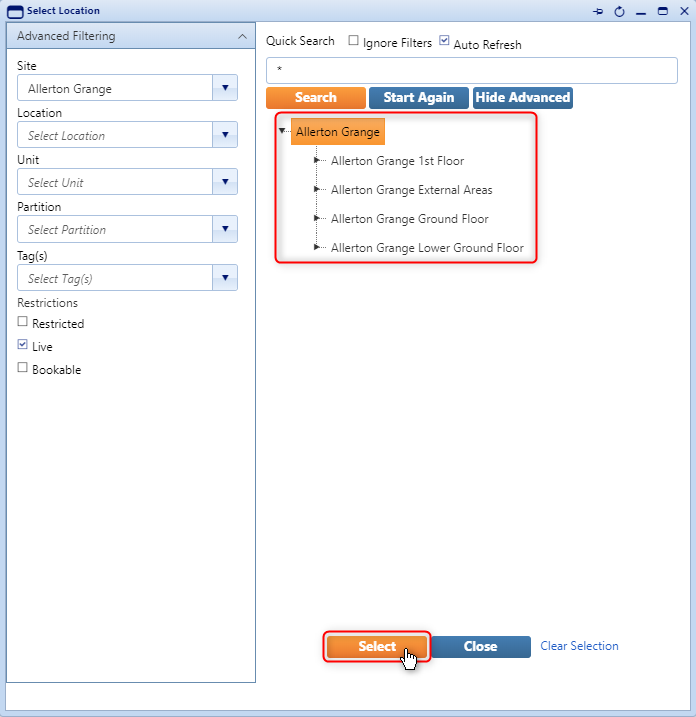
- Select the Site and then the Select button.
- The Geography should now be added to the user, as shown below.
- Select Save, and a notification will appear at the top of the screen to confirm that the Personnel has been updated, as shown below. The user should now be able to login successfully.


Logging a New Event – Values Provided Fail the Service/Work Type Checks
When attempting to log a new Service Event, if a QFM user encounters a system message which says “The values provided fail the Service/Work Type checks” (as shown below), then the user should refer to an Administrator to check QFM General Settings.

This procedure explains how an Administrator should make the appropriate checks to resolve the issue.
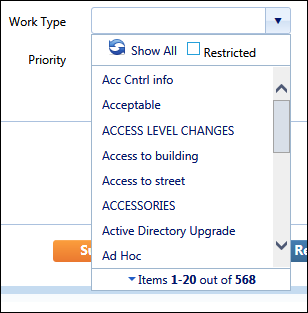
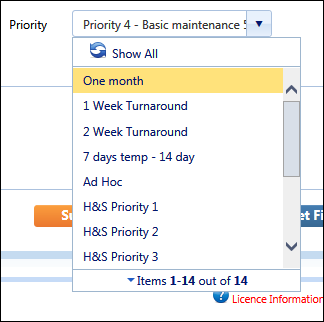
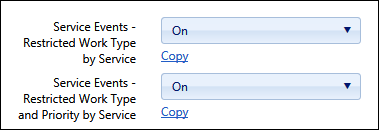
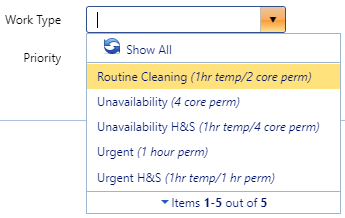
- Within the New Service Event screen, when adding a Work Type and Priority from the lists of available values, there may be an option to Restrict the list. If unchecked, this will allow you to choose any Work Type and Priority. This will then cause the above error when trying to submit the New Service Event.
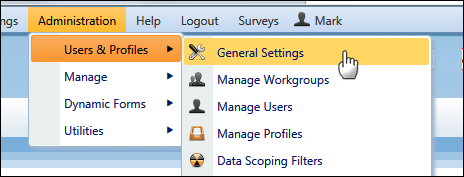
- To disable the option to uncheck Restricted, go to Administration > Users & Profiles > General Settings.
- In the General Settings screen, select settings for the Global User Class, then open down the General Event Logging tab, and under Behaviour there will be two options to Restrict Work Type and Priority by Service, as shown below. Both options should be turned on to disable the Restriction button.
- Once the options have been selected, click Apply Settings at the bottom of the page.
Note: When you Apply Settings you will be asked to login again.
- The Restriction option should not now appear when selecting a Work Type.
User Unable to Login – Account No Longer Active
If a user encounters the system message “The user account specified is no longer active” when attempting to log in to QFM, a QFM administrator must reinstate the account to allow the user to log in successfully.
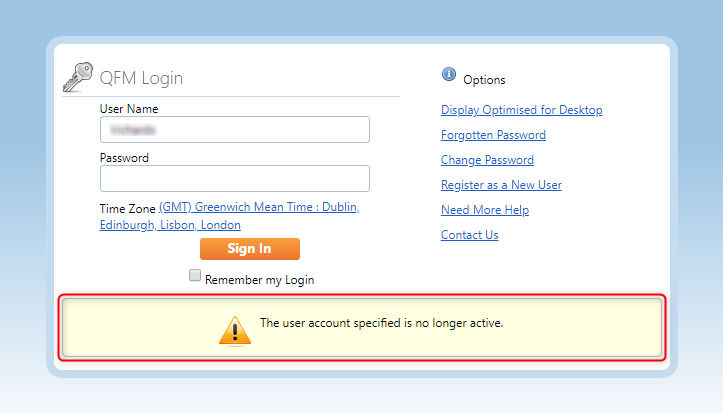
- To reinstate an expired user account, access Administration > Users & Profiles > Manage Users, then search for the User record.
Note: Make sure the Active Only box is unchecked.
- In the Status column you should then be able to see an option to Reinstate User. Once you have selected this option, it should change to Expire User. The User’s account will now be active, and they should be able to login.


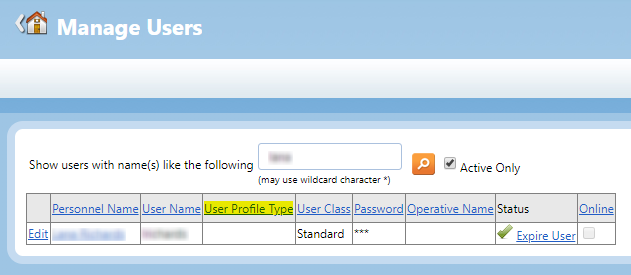
User Unable to Log In – No Role Mapped to Class
Use this procedure when you encounter the system message below, when attempting to log in to QFM.
![]()
- If a User is unable to login and encounters the error shown above, access Administration > Users & Profiles > Manage Users, then search for the User.
- In order to be able to login, a User Profile Type is required. As can be seen in the screenshot below, the User does not currently have a User Profile Type.
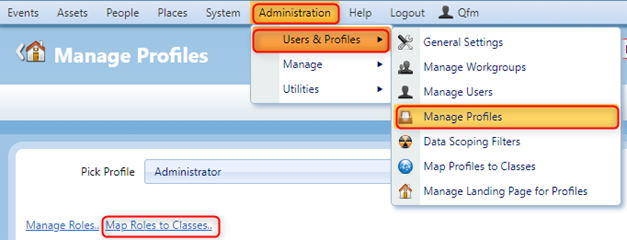
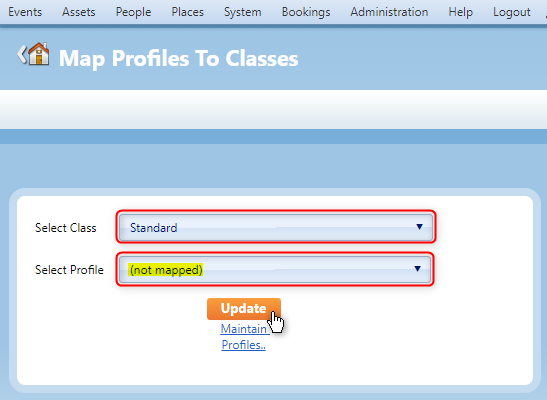
- To add a User Profile Type for the User, access Administration > Users & Profiles > Manage Profiles and select Map Roles to Classes.
- You should now be able to Select the User Class and choose a Profile to which it can be mapped.
Note: Make sure to select the same User Class that is already assigned to the User in the Manage Users screen.
- Select Update then the User should be able to login.

How to change the Default Geography for a QFM User
Here, we show how to assign geography details to QFM Personnel.
It is important to maintain the correct geography for QFM Personnel.
A QFM User will not be able to log in to the system unless they have a Personnel record which has geography assigned. Also, the geography assigned to Personnel can automatically populate screens when the Personnel is selected, e.g. when adding the ‘Reported By’ person to a new Event.
- Go to the Find Personnel screen.
- Search for the Personnel record by Name or Personnel Reference.
- To add or update the address in the Geography field, select the Change button then select the Geography field Lookup button.
- Search for the new geography.
- Select the new Geography then click the Select button.
- Select Save to assign the geography.


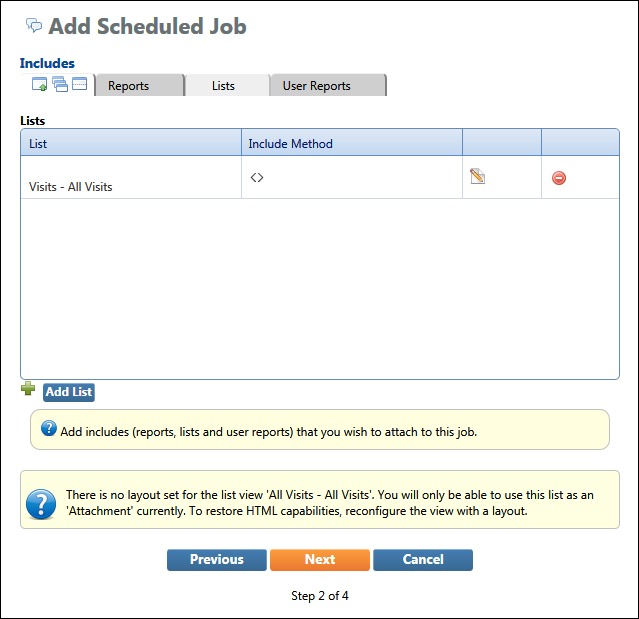
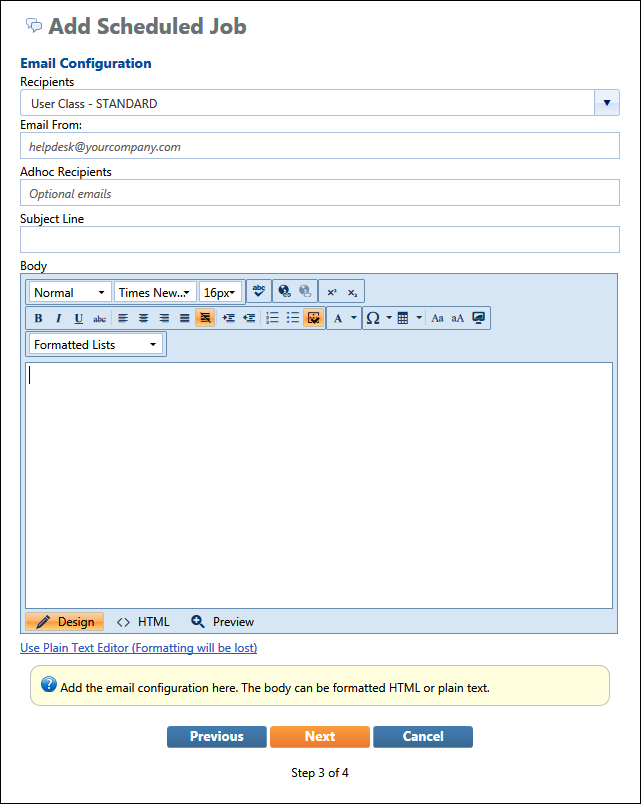
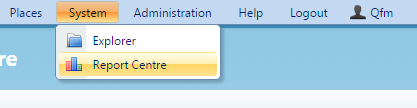
How to Create and Schedule a List Report
Here, we show how to create a List Report with customised filters then schedule the report to be generated automatically.
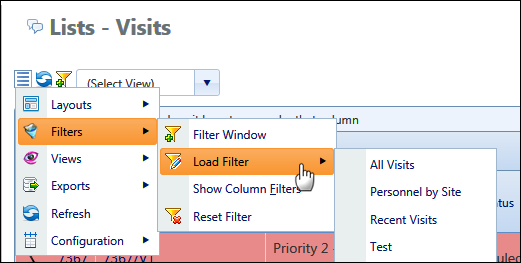
- Go to the Report Centre (System > Report Centre) and select the List Report required.
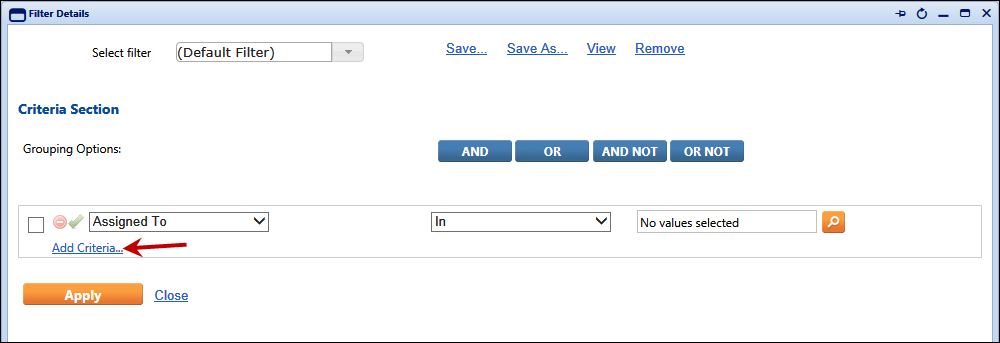
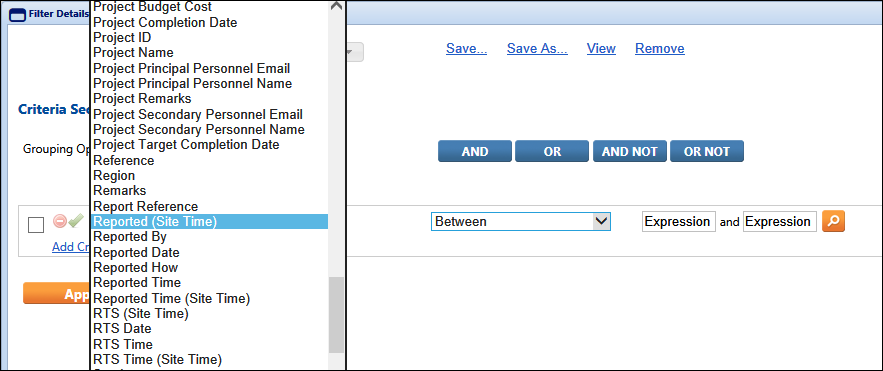
- Select Filters then in the Filter Details window add your criteria as appropriate.
- Select Add Criteria… then make your criteria selection from the first drop down list (left to right). Once you have selected a value, select a condition from the second drop down list, (these are context sensitive and change according to the criteria selected). Select a condition value or set of values in the third (lookup) field.
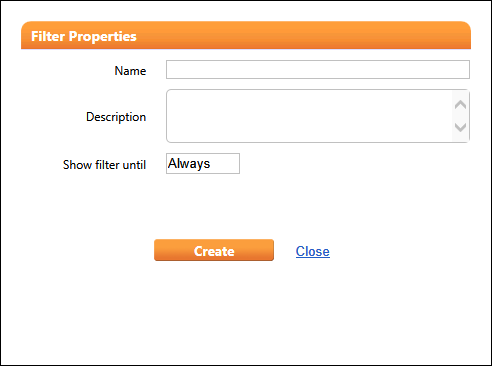
You may enter any number of criteria values; simply select Add Criteria… to display another row. Once you have selected all your criteria, you can add Grouping Options and apply these by ticking the box (left end of each criteria row) for each criteria you wish to include. - Once all criteria are selected you can save the selections to the Filter list to be used again. Simply select Save As… then in the Filter Properties window add a Name and Description. You can also leave the Filter as always available (Show filter until) or specify a date after which the Filter will become unavailable.
Select Create. - The Filter is now saved and can be selected from the Filters menu.
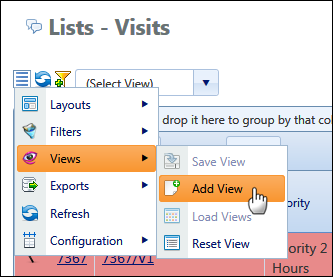
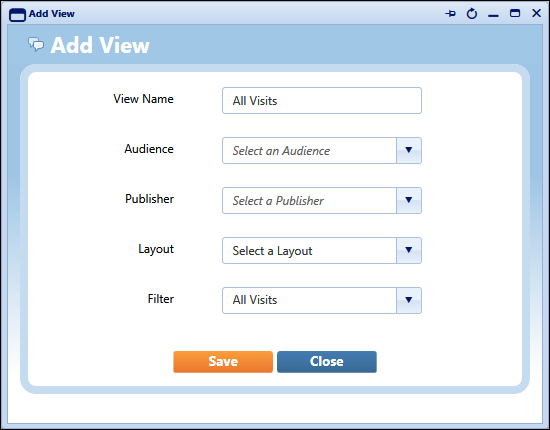
- Next, create a new View. From the Views menu select Add View.
- Add the details in the Add View window, ensuring to add a View Name and select the Filter you created.
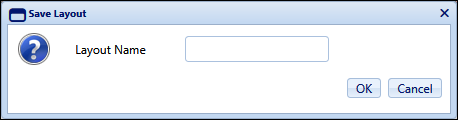
Select Save. - Next, with the View and Filter loaded, select Save Layout from the Layouts menu.
- Save a Layout Name then select OK.
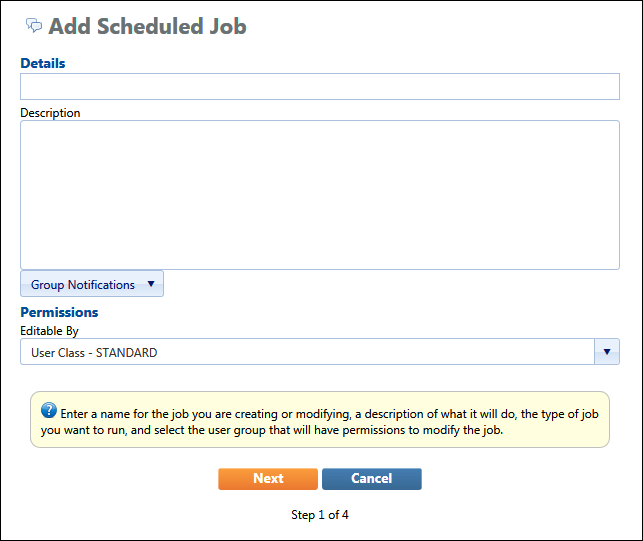
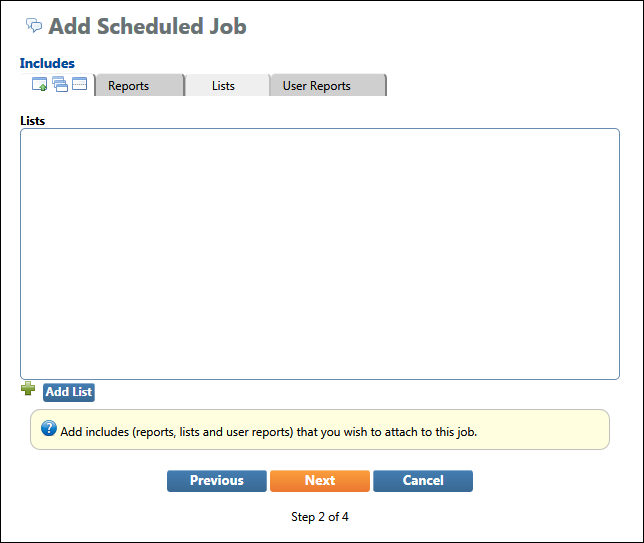
- To set up the automated report production, go to Add Schedule from Scheduled Jobs in the Report Centre.
- Complete the schedule details on the screens shown below.


How to Apply Report Filters
Here, we show how to apply filters to List Reports. In this example a date range is added as filter criteria.
- Go to Report Centre.
- Select a List Report.
- Select Filters
- In the first Criteria field (left to right), select an item from the drop down list.
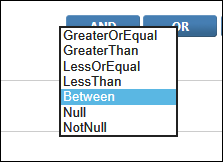
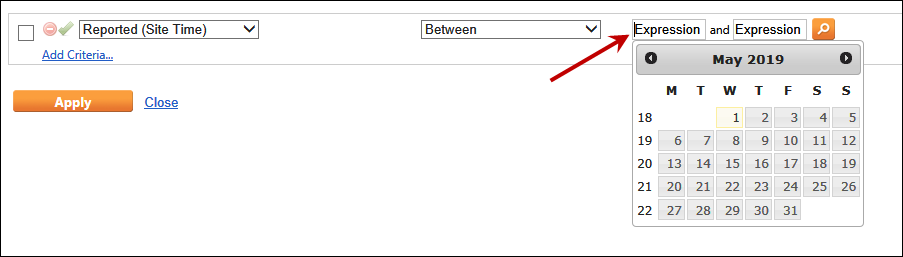
- In the second Criteria field, select Between (for a date range).
- Select a date range in the fields at the end of the row. Click into each field to select a date from the calendar.
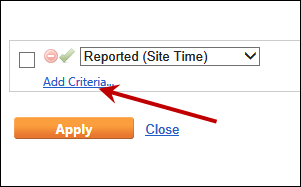
- You can add further criteria filters by selecting Add Criteria…
The fields will differ by criteria item, e.g. two fields for a date range, one field for a condition (e.g. ‘Contains’).
- Once you have added all the required criteria, select Results are displayed on-screen.


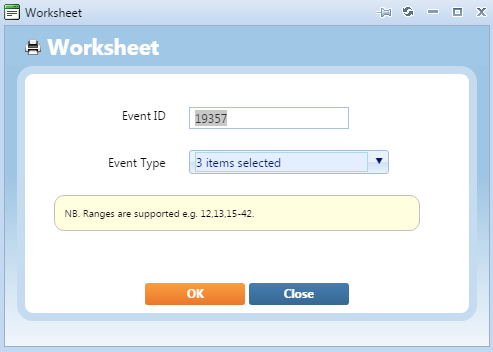
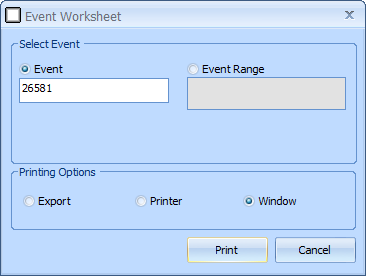
How do I print Event worksheets?
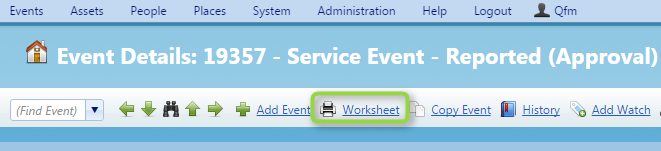
- To print an Event Worksheet on QFM Web navigate to the event you wish to print and click ‘Print Worksheet’.
You will be presented with a pop-up window, click ‘OK’ on this and the worksheet will be downloaded.
To print an Event Worksheet on QFM Desktop, navigate to the event you wish to print and click the printer icon in the top left.
- You will be presented with a pop-up window, click ‘Yes’ on this and the worksheet will be downloaded to a report viewer and from here you can save it where you want.
How can I change the view on Event Director so it looks the same on QFM Web and QM Desktop?
Problem
How can I change the view on Event Director so it looks the same on QFM Web and QM Desktop?
Resolution
The Event Director on the Desktop contains all the data in the system; it has the capacity to do this as it is a standalone program.
The Event Director programme on QFM Web is filtered based on time scale – the default value for this is 30 days but this can be changed as you require. The reason we have a filter on the Web Event Director is to increase the performance of the system.
It is not recommend that you make these two Directors match, as the filters prevent performance issues on QFM Web.
How do I import data into QFM?
Problem
How do I import data into QFM?
Resolution
QFM data import not recommend by SWG without prior training, as incorrectly imported data can result in problems throughout the system.
The import can be collated on an Excel document named ‘Data Import Spreadsheet’, and a blank copy of the spreadsheet can be found on the root directory of your QFM5 Desktop install.
SWG offer training courses on the QFM Import; please contact your SWG Account Manager or Support team on support@swg.com to learn more.
How do I delete old event data from QFM?
Problem
How do I delete old event data from QFM?
Resolution
Event data is locked down and cannot be easily deleted from the system, since it is standard practice to retain historical event data for auditing purposes. If required, SWG can archive old data and create a blank database which does not contain any historical event data, which can be used moving forward.
If you wish to find out more about SWG’s data archiving services, please email support@swg.com or contact your SWG Account Manager.
How do I create Sites?
Problem
How do I create Sites?
Resolution
To create a new site, the best way is to login to QFM Desktop.
- Navigate to ‘Site’.
- Click the ‘Add’ button in the bottom right corner (as is the standard in QFM Desktop).
- You will now be able to enter values for a new Site, when you have finished click ‘Save’ in the bottom right.

How do I create new Geography in the correct format?
Problem
How do I create new Geography in the correct format?
Resolution
The correct format for Geography differs from one client to the next there is no set standard across the board.
The most common approach however is to use one of four levels:
- Site – The complex/campus name e.g. The Olympic Park.
- Location – The building name e.g. The Olympic Stadium.
- Unit – The area or floor number e.g. Level 1.
- Partition – The room number or partition e.g. D45e.
How do I create new QFM user accounts?
Problem
How do I create new QFM user accounts?
Resolution
To setup new user accounts you will need to log in to QFM Desktop with a user who has Administrator rights.
- First navigate to ‘Personnel’ and create a new personnel record for the new user to use.
- Now navigate to ‘Maintain Users’ from the Admin tab.
- Click the ‘Add’ button in the bottom right which will start the new user wizard:
a. Enter a username.
b. Select the personnel name which you have just created in the previous step.
c. Create a password.
d. Select your language.
e. When you have added all of these fields you can now save the new User. There are additional fields such as Expiry date but these are optional.
How do I create a Schedule Planner Report?
Problem
How do I create a Schedule Planner Report?
Resolution
- You can create a Schedule Planner Report via the Report Centre.
- You can then either :
a. Generate an Event History Report and create a filter for PM Events (this process is explained in detail in ‘How do I create a report based on filters in QFM Web?’)
b. Generate a ‘Year Planner Report’ which will be report version of the same thing you see on the Schedule Planner screen.
I am unable to create a new report in the QFM User Reports screen, as the ‘Add’ button is disabled.
Problem
I want to create a new report in the QFM User Reports screen, but am unable to do this as the ‘Add’ button is disabled.
Cause
There is QFM system parameter which switches on/off the ability to add new reports. If this parameter is set to ‘Off’ then the ‘Add’ button will be disabled.
Resolution
To enable the ‘Add’ button in the User Reports screen follow the steps below:
Note; this procedure must be undertaken by a user with QFM administrator rights.
- Log in to QFM as an Administrator.
- Navigate to Applications > Admin > Maintain Classes.
- In the Permissions section, select System then the blue box next to User Reports. This opens the QFM Parameters section on the right-hand side of the screen.
- In the QFM Parameters section navigate to the sections named Allow Add/Update. Ensure the setting for Allow is Yes.
Error Message in Crystal Reports “Failed to open the connection. Details: ADO Error Code: 0x80004005. Source: Microsoft OLE DB Provider for SQL Server. Description: [DBNETLIB][ConnectionOpen
Problem
When attempting to connect Crystal Reports to your QFM database, you may receive an error message that is similar to the following:
“Failed to open the connection. Details: ADO Error Code: 0x80004005. Source: Microsoft OLE DB Provider for SQL Server. Description: [DBNETLIB][ConnectionOpen (Connect()).]SQL Server does not exist or access denied. SQL State: 08001. Native Error: 17 [Database Vendor Code: 17]”.
Resolution
Install Crystal Reports version 9 or later.
When I try to assign an operative to an event I receive the QFM message “No Operative records available”, despite having successfully assigned operatives from this contractor in the past.
Problem
When I try to assign an operative to an event (in the Event screen Contractor tab) I receive the QFM message “No Operative records available”, despite having successfully assigned operatives from this contractor in the past.
Cause
This message usually appears when:
- No operative records have been created under the contractor assigned to the event.
- The operative record(s) created under the contractor assigned to the event hold an end-date which is in the past and therefore the operative(s) is suppressed. If all operatives entered against a contractor have been end-dated then this message will appear.
If operatives have been successfully assigned from this contractor in the past then the most likely reason will be ‘2)’.
Resolution
Check the status of the operative records which belong to the contractor you are using on the event to see if they have been end-dated. If they have an end-date which is in the past, you may update this date with a new future date, if the operative are still valid.
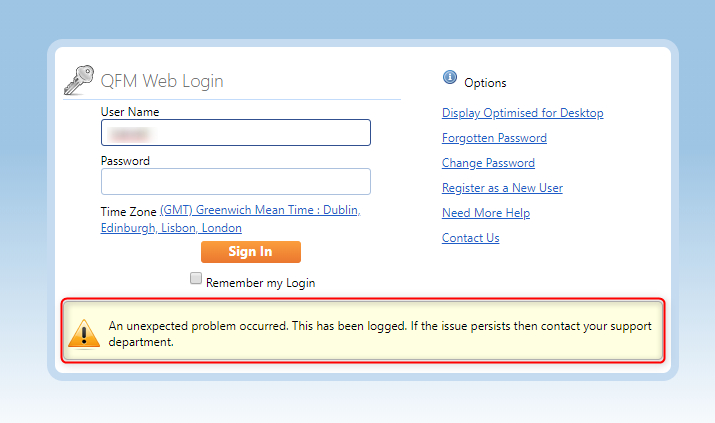
I tried to login to QFM and it gave the message “Wrong password entered.”
Problem
tried to log into QFM and it gave the message “Wrong password entered.”
Resolution
If your Username and Password were set up for you by your system administrator then they will be able to retrieve the password for you or re-set it to a new password to enable you to log in.
If your Username and Password created automatically via the QFM Web Login screen then you can use the “Forgotten Password?” link to request your current password via email, or use the “Need More Help?” link to send an email to the administrator of your system.
When running QFM graphical reports, the output screen displays but the entire graph area is blank.
Problem
When running QFM graphical reports, the output screen displays but the entire graph area is blank. This affects both event and booking graphical reports.
Cause
This issue relates to Crystal runtime installed on certain PCs.
Resolution
On the affected PC, locate the file named “SSCDK80.dll” in “C:\Program Files\Common Files\Crystal Decisions\2.0\bin
Copy the “SSCDK80.dll” file to the following location: C:\Windows\System32
How can I change/update the text of the automated email notifications for events?
Problem
I would like to change/update the text of the automated email notifications produced for events. How can I do this?
Resolution
The Configure Text screen (Applications > Admin > Configure Text) allows administrators to add and maintain text for the configurable elements of email notifications. These include header/footer, subject, body text, etc.
Parameters which control the usage of email notifications are available on the Maintain Classes screen (Applications > Admin > Maintain Classes). Email Confirmation parameters are located in the FM\FM Event\Event section.
Whenever I update an event with job progress, an automatic notification is sent to the Reported By/Requested By/Assigned To personnel. How can I stop these automatic notifications?
Problem
Whenever I make an update to an event regarding job progress, an automatic notification is sent to the Reported By/Requested By/Assigned To personnel. How can I stop these automatic notifications?
Cause
QFM configuration settings are switched on so that these personnel receive automatic notifications when events are updated.
Resolution
This procedure must be undertaken by a user with QFM administrator rights.
To disable the notifications when an event is updated:
- Log in to QFM as an Administrator.
- Navigate to Applications > Admin > Maintain Classes, then use the navigation arrows at top left to locate the Global User Class.
- In the Permissions section, select FM > FM Event then the blue box next to Event. This opens the QFM Parameters section on the right-hand side of the screen.
- In the QFM Parameters section navigate to the sections named Email Confirmation to Assigned To, Email Confirmation to Reported By and Email Confirmation to Requested By. Here you have the options to control when email notifications are sent/not sent, at different stages of the event cycle.
The Geography Search screen appears different to the usual format. How/why has this changed?
Problem
The Geography Search screen appears different to the usual format. How/why has this changed and can it be changed back to its previous format?
Cause
There are two available styles of Geography Search screen. The traditional default screen and a tree-view style alternative. The configuration for your User Class may have changed.
Resolution
To change the configuration setting for the Geography Search screen, follow the steps below. Note; this procedure must be undertaken by a user with QFM administrator rights.
- Log in to QFM as an Administrator.
- Navigate to Applications > Admin > Maintain Classes, then use the navigation arrows at top left to locate the User Class you wish to change.
- In the Permissions section, select QFM > Environment then the blue box next to Custom. This opens the QFM Parameters section on the right-hand side of the screen.
- In the QFM Parameters section navigate to the section named Geography. Here, the Use TreeView Search parameter allows you to choose which style of Geography Search screen is used.
The time displayed in QFM is not accurate. How can I change it?
Problem
The time displayed in QFM is not accurate. How can I change it?
Cause
QFM uses both the time taken from the server and the time from your PC operating system.
Resolution
To be sure that all times displayed in, and used by, QFM are accurate you should ensure that the server time and your PC operating system time are accurate and synchronised.
How can I change/update the text of the automated email notifications for events?
Problem
I would like to change/update the text of the automated email notifications produced for events. How can I do this?
Resolution
Parameters which control the usage of email notifications are available on the Maintain Classes screen (Applications > Admin > Maintain Classes) as follows:
- Log in to QFM as an Administrator.
- Navigate to Applications > Admin > Maintain Classes, then use the navigation arrows at top left to locate the Global User Class.
- In the Permissions section, select FM > FM Event then the blue box next to Event. This opens the QFM Parameters section on the right-hand side of the screen.
- In the QFM Parameters section there are two main groups of notifications parameters; Standard parameters which control the sending of an event worksheet with a blank email, and Advanced parameters which allow you to set email confirmations to be sent to various recipients at different stages in the event process.
Navigate to parameters beginning Notification To for Standard parameters, and to parameters beginning Email Confirmation for Advanced parameters.
If I change a QFM record name, e.g. Contractor, Personnel, Department etc. what effect will this have on historical reporting?
Question
If I change a QFM record name, e.g. Contractor, Personnel, Department etc. what effect will this have on historical reporting?
Information
When a record name is changed in the QFM database, the change is immediately effective retrospectively as well as post name change. There are no historical records are kept in the ‘old’ name and so every trace of the ‘old’ name is replaced with the ‘new’ name.
For example, if a personnel name is changed from Sarah Smith to Sarah Green then every existing historical record of Sarah Smith held in the system (e.g. included on event records) will now become Sarah Green.
In summary, QFM regards the record as staying the same but recognises that just the name ‘label’ has changed.
When I make a long term Accommodation Booking, the Planner applies random gaps in the booking.
Problem
When I make a long term Accommodation Booking, the Planner applies random gaps in the booking.
Cause
This issue is due to a defect which is now subsequently fixed.
Resolution
To obtain the fix for this issue, upgrade to desktop QFM version 164.00.00.05.
Event worksheets are not being sent with notification emails.
Problem
Event worksheets are not being sent with notification emails.
Cause
This could be caused by one of several reasons, relating to system parameters or user permissions.
Resolution
Follow the steps below to resolve the problem:
Check System Parameters:
- Log in to QFM as an Administrator.
- Navigate to Applications > Admin > Maintain Classes, then use the navigation arrows at top left to locate the User Class you wish to change.
- In the Permissions section, select FM > FM Event then the blue box next to Event. This opens the QFM Parameters section on the right-hand side of the screen.
- In the QFM Parameters section navigate to the parameters beginning Email Confirmation. Here, check that Include Worksheet is set to Yes, for either/all of the Email Confirmation to Assigned To, Email Confirmation to Reported By and Email Confirmation to Requested By parameters, as appropriate.
If this does not resolve the problem then attempt to manually create the worksheet by clicking the Generate Report icon on the Event screen.
If you can create the worksheet manually, then the reason for the problem is that you do not have the correct system permissions. Contact your IT department to ensure you have ‘Modify’ rights to the following folder: “C:\Program Files\QFM40\System32\Reports\WorkSheets”.
If you cannot create the worksheet manually, then contact the SWG Support Centre with a full description of the problem and the steps you have taken.
Why does a particular event not appear in Event Director?
Problem
A particular event record does not appear in Event Director.
Cause
There are several possible causes:
- No Priority is assigned to the event.
- The event has a Priority assigned, but the Priority has no calculation period and escalations set up.
- The event has a Priority assigned, but it is not currently in the active escalation range of the Priority.
- The event is a Scheduled Event with a Reported date set in the future, (i.e. the event has been generated by Start of Day to begin on a future date).
Resolution
- You may assign a Priority to the event retrospectively, so as to allow the event to move through the event cycle.
- You may change the Priority assigned to the event, or add a calculation period and escalations to the existing Priority (Applications > FM > FM Event > Priority > Priority Details).
- N/A
- N/A
Can I run QFM on two separate screens?
Question
Can I run QFM on two separate screens from the same PC?
Answer
There are two potential solutions:
- Open QFM and enlarge the window to fit over both screens, by manually dragging the window border with the mouse in ‘arrow’ mode.
Note: This may not be the most practical way to use QFM and may give unpredictable results. - Open QFM, then open another QFM window (use Window > New Window), so that you are displaying a separate QFM window on each screen.
Note: This does not affect the number of licenses used, as licenses are counted by unique machine name.
How can I produce a report detailing forthcoming planned maintenance events?
Answer
Reports for all scheduled activities can be generated from both the QFM System Diary and Year Planner. These tools provide numerous filter options so you can specify the selection criteria of your choice. A specific Reports option enables you to specify a date range and select output options.
(Applications > System > System Diary/Year Planner)
When creating an event, the Priority I select does not generate an event Due date and time. Why not?
Problem
When I create an event there is no Due date and time populated, despite a Priority being entered. Why?
Cause
This may be due to the Priority in question not having a calculation period set up. It could also happen if the event is at Reported stage (i.e. a contractor has not been notified) but the Priority applied to the event starts its Due period from Notified stage.
Resolution
You can establish the reason for this issue by viewing the Priority in question, in the Priority Details screen. In the Due Time section you can see whether the Priority calculates its Due period from Reported or Notified stage. You can also see whether a Calculation Period and Cover code are applied. A Calculation Period and Cover code must be applied in order for the Priority to function correctly.
Unable to add catering to a room booking.
Problem
You are unable to catering to a booking, via the Catering tab of the Room Booking screen. When selecting an item of catering from the drop-down list, the field does not populate.
Cause
Unknown.
Resolution
Contact the SWG Support Centre, as the following script will need to be run against your database.
ALTER PROCEDURE dbo.qfm_RoomCatering
@GeographyID int,
@Date DateTime = Null
AS
Declare @Catering Table(CateringID integer)
SET NOCOUNT ON
If @Date is Null
Begin
Insert @Catering
Select Distinct(a.CateringUseID)
From CateringUse a join CateringScope b
on a.CateringUseID = b.CateringUseID
Where (b.GeographyID in (Select GeographyID from dbo.GeogFamilyID(@GeographyID))
Or b.RegionID in (Select RegionID from dbo.RegionFamilyID(@GeographyID)))
Insert @Catering
Select Distinct(a.CateringUseID)
From CateringUse a
where a.CateringUseID not in
(Select Distinct CateringUseID from CateringScope)
Select CateringUseId, Code,
Description,Cost,Messages,CateringTypeID,
StartDate,EndDate,ExcludeFromDate,ExcludeToDate,
dbo.CateringRestrictionString(@GeographyID,CateringTypeID) as CatString,
vatid as initialvatcode –GJA
From CateringUse
— MBH 2003 To ensure that all services are shown even
— if the scope changes
— Where CateringUseID in (Select CateringID from @Catering)
End
Else
Begin
Insert @Catering
Select Distinct(a.CateringUseID)
From CateringUse a join CateringScope b
on a.CateringUseID = b.CateringUseID
Where (b.GeographyID in (Select GeographyID from dbo.GeogFamilyID(@GeographyID))
Or b.RegionID in (Select RegionID from dbo.RegionFamilyID(@GeographyID)))
And (@Date >= a.StartDate Or a.StartDate is Null)
And (@Date <= a.EndDate Or a.EndDate is Null)
And ((a.ExcludeFromDate is Null And a.ExcludeToDate is Null)
Or @Date Not between a.ExcludeFromDate And a.ExcludeToDate )
— This second part of the insert gets all of those Caterings
— that are available in all geographic locations excluded only
— by Include and Exclude Dates
Insert @Catering
Select Distinct(a.CateringUseID)
From CateringUse a
where (@Date >= a.StartDate Or a.StartDate is Null)
And (@Date <= a.EndDate Or a.EndDate is Null)
And ((a.ExcludeFromDate is Null And a.ExcludeToDate is Null)
Or @Date Not between a.ExcludeFromDate And a.ExcludeToDate )
And a.CateringUseID not in
(Select Distinct CateringUseID from CateringScope)
Select CateringUseId, Code,Description,Cost ,Messages, isnull(ShowMessages,0) as ShowMessages,
vatid as initialvatcode –GJA
From CateringUse
Where CateringUseID in (Select CateringID from @Catering)
End
SET NOCOUNT OFF
Event Worksheet – blank time values in Status fields.
Problem
When you create an Event Worksheet, either displayed in a window or generated automatically for sending with an email, the worksheet does not display the correct time values in the Status fields at the bottom of the first page. Instead, these fields are blank.
Cause
This can be caused when you have a customised worksheet installed but the script that accompanies the worksheet has not been run on the database.
Resolution
If the worksheet is a customised worksheet, make sure the script that accompanies the worksheet is run against the database you are using. For assistance, contact your IT department or the Service Works Global Support Centre.